Universal Game AI — Documentation#
UGA (Universal Game AI) is a desktop application for recording gameplay datasets, training neural network agents, and running them on live game windows. At the core of the application is the proprietary Mimiq model — a hybrid neural network that learns to imitate player actions by observing the screen.
The documentation consists of two parts. The first explains the interface and the full workflow — from recording your first dataset to publishing a finished agent. Everyone getting started with the application should read it. The second part covers the Mimiq architecture, training details, experiments conducted, and data collection recommendations — it is aimed at those who want to understand how the application works under the hood and get the most out of it.
Technical Details#
GPU Support#
Universal Game AI works on any computer. GPU hardware acceleration is available on NVIDIA graphics cards and Apple Silicon computers. On other hardware, the application automatically switches to CPU.
Supported Configurations#
| Hardware | GPU acceleration | Runtime mode |
|---|---|---|
| NVIDIA (GTX 10 series and newer) | Yes | GPU (CUDA) |
| Apple Silicon (M1-M5) | Yes | GPU (Metal) |
| AMD (Radeon) | No | CPU |
| Intel (Arc / integrated graphics) | No | CPU |
| No discrete graphics card | No | CPU |
AMD and Intel are not supported for GPU acceleration. The application is built on a machine learning library that uses NVIDIA CUDA. AMD and Intel graphics card owners can use the application in CPU mode.
Supported NVIDIA Graphics Cards#
GPU acceleration is supported on NVIDIA graphics cards starting with the GeForce GTX 10 series (Pascal). You do not need to install the CUDA Toolkit separately — the required components are already included with the application. Only an up-to-date NVIDIA driver is required.
Full Support#
| Series | Examples |
|---|---|
| GeForce RTX 50 (Blackwell) | RTX 5090, 5080, 5070 Ti, 5070, 5060 |
| GeForce RTX 40 (Ada Lovelace) | RTX 4090, 4080, 4070, 4060, 4050 |
| GeForce RTX 30 (Ampere) | RTX 3090, 3080, 3070, 3060, 3050 |
| GeForce RTX 20 (Turing) | RTX 2080 Ti, 2070, 2060 |
| GeForce GTX 16 (Turing) | GTX 1660 Ti, 1660, 1650 |
| Professional / server | RTX A-series, T4, A100, H100, V100, Titan V/RTX |
Mobile versions of the listed graphics cards are also supported for laptops.
Partial Support#
| Series | Examples | Note |
|---|---|---|
| GeForce GTX 10 (Pascal) | GTX 1080 Ti, 1070, 1060, 1050 | Usually work, but are not officially guaranteed |
| GeForce GTX 900 (Maxwell) | GTX 980, 970, 960 | May be unsupported in some builds |
If the graphics card is not supported, the application will show GPU Not Supported. In that case, switch the device to CPU in settings.
Not Supported#
- GeForce GTX 700/600 and older NVIDIA generations.
- Any AMD or Intel graphics cards for GPU acceleration.
NVIDIA Driver Requirements#
GPU acceleration requires an up-to-date Game Ready or Studio driver:
- Download: nvidia.com/drivers or through the NVIDIA App / GeForce Experience application.
- For the RTX 50 (Blackwell) series, the minimum driver version is 570.
- After updating the driver, you must restart your computer.
You do not need to install the CUDA Toolkit separately — it is already included with the application.
How to Identify Your Graphics Card Model#
Windows: Ctrl + Shift + Esc → Performance tab → GPU section.
Alternatively: right-click the desktop → Display settings → Advanced display settings.
Troubleshooting#
If GPU acceleration does not activate:
- Make sure your graphics card is included in the supported list above.
- Update the NVIDIA driver to the latest version and restart your computer.
- Update the application itself — newer versions may add support for additional cards.
- If the problem remains, switch the device to CPU in settings.
If the application shows a GPU error window, click View detailed log → Copy log and report it to the developers. You can leave a question on the forum or go to the problem report page and report the error. This significantly speeds up diagnostics.
Part 1 — Working with the Application#
Interface and First Launch#
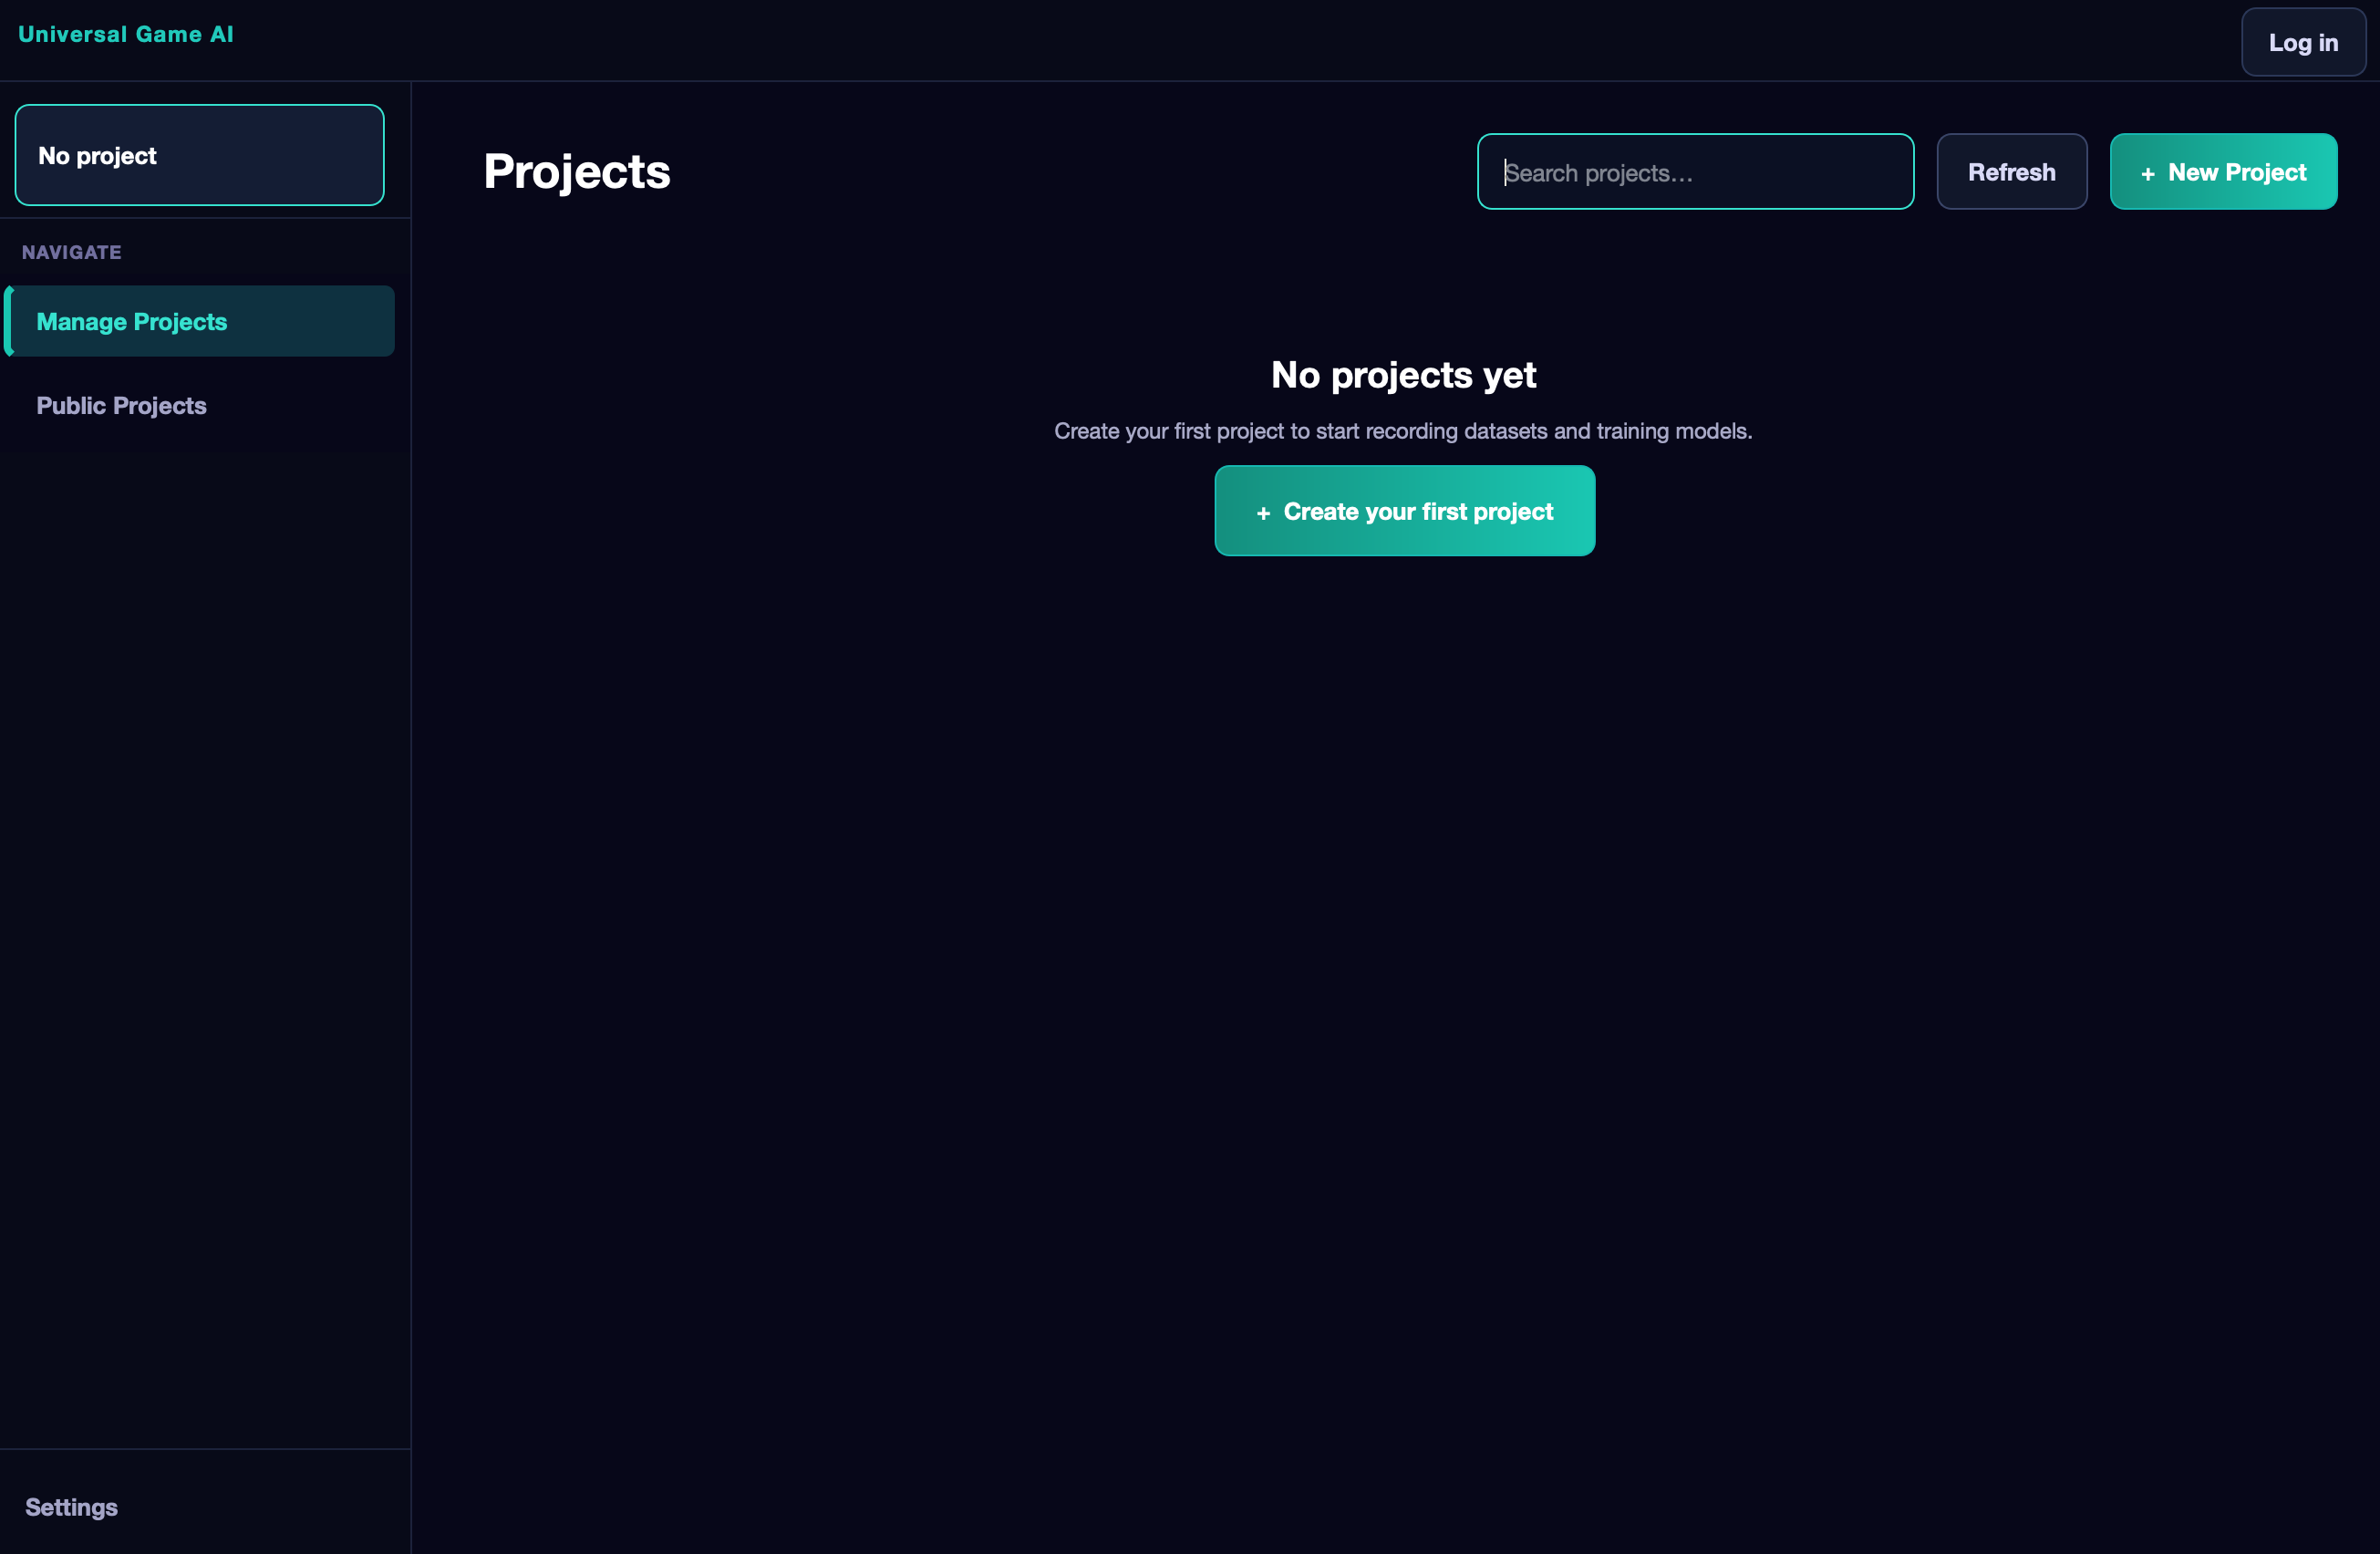
On first launch, the application opens the Projects page. On the left is a sidebar containing all navigation. At the top is a dropdown menu with a list of all your projects and a button to create a new one. Below are two main navigation items: Manage Projects (your projects) and Public Projects (the public project catalog).
Account#
The application can be used without registration and without an internet connection, but in that case two features are unavailable: downloading public projects from other authors and publishing your own. If that is acceptable — simply skip this section.
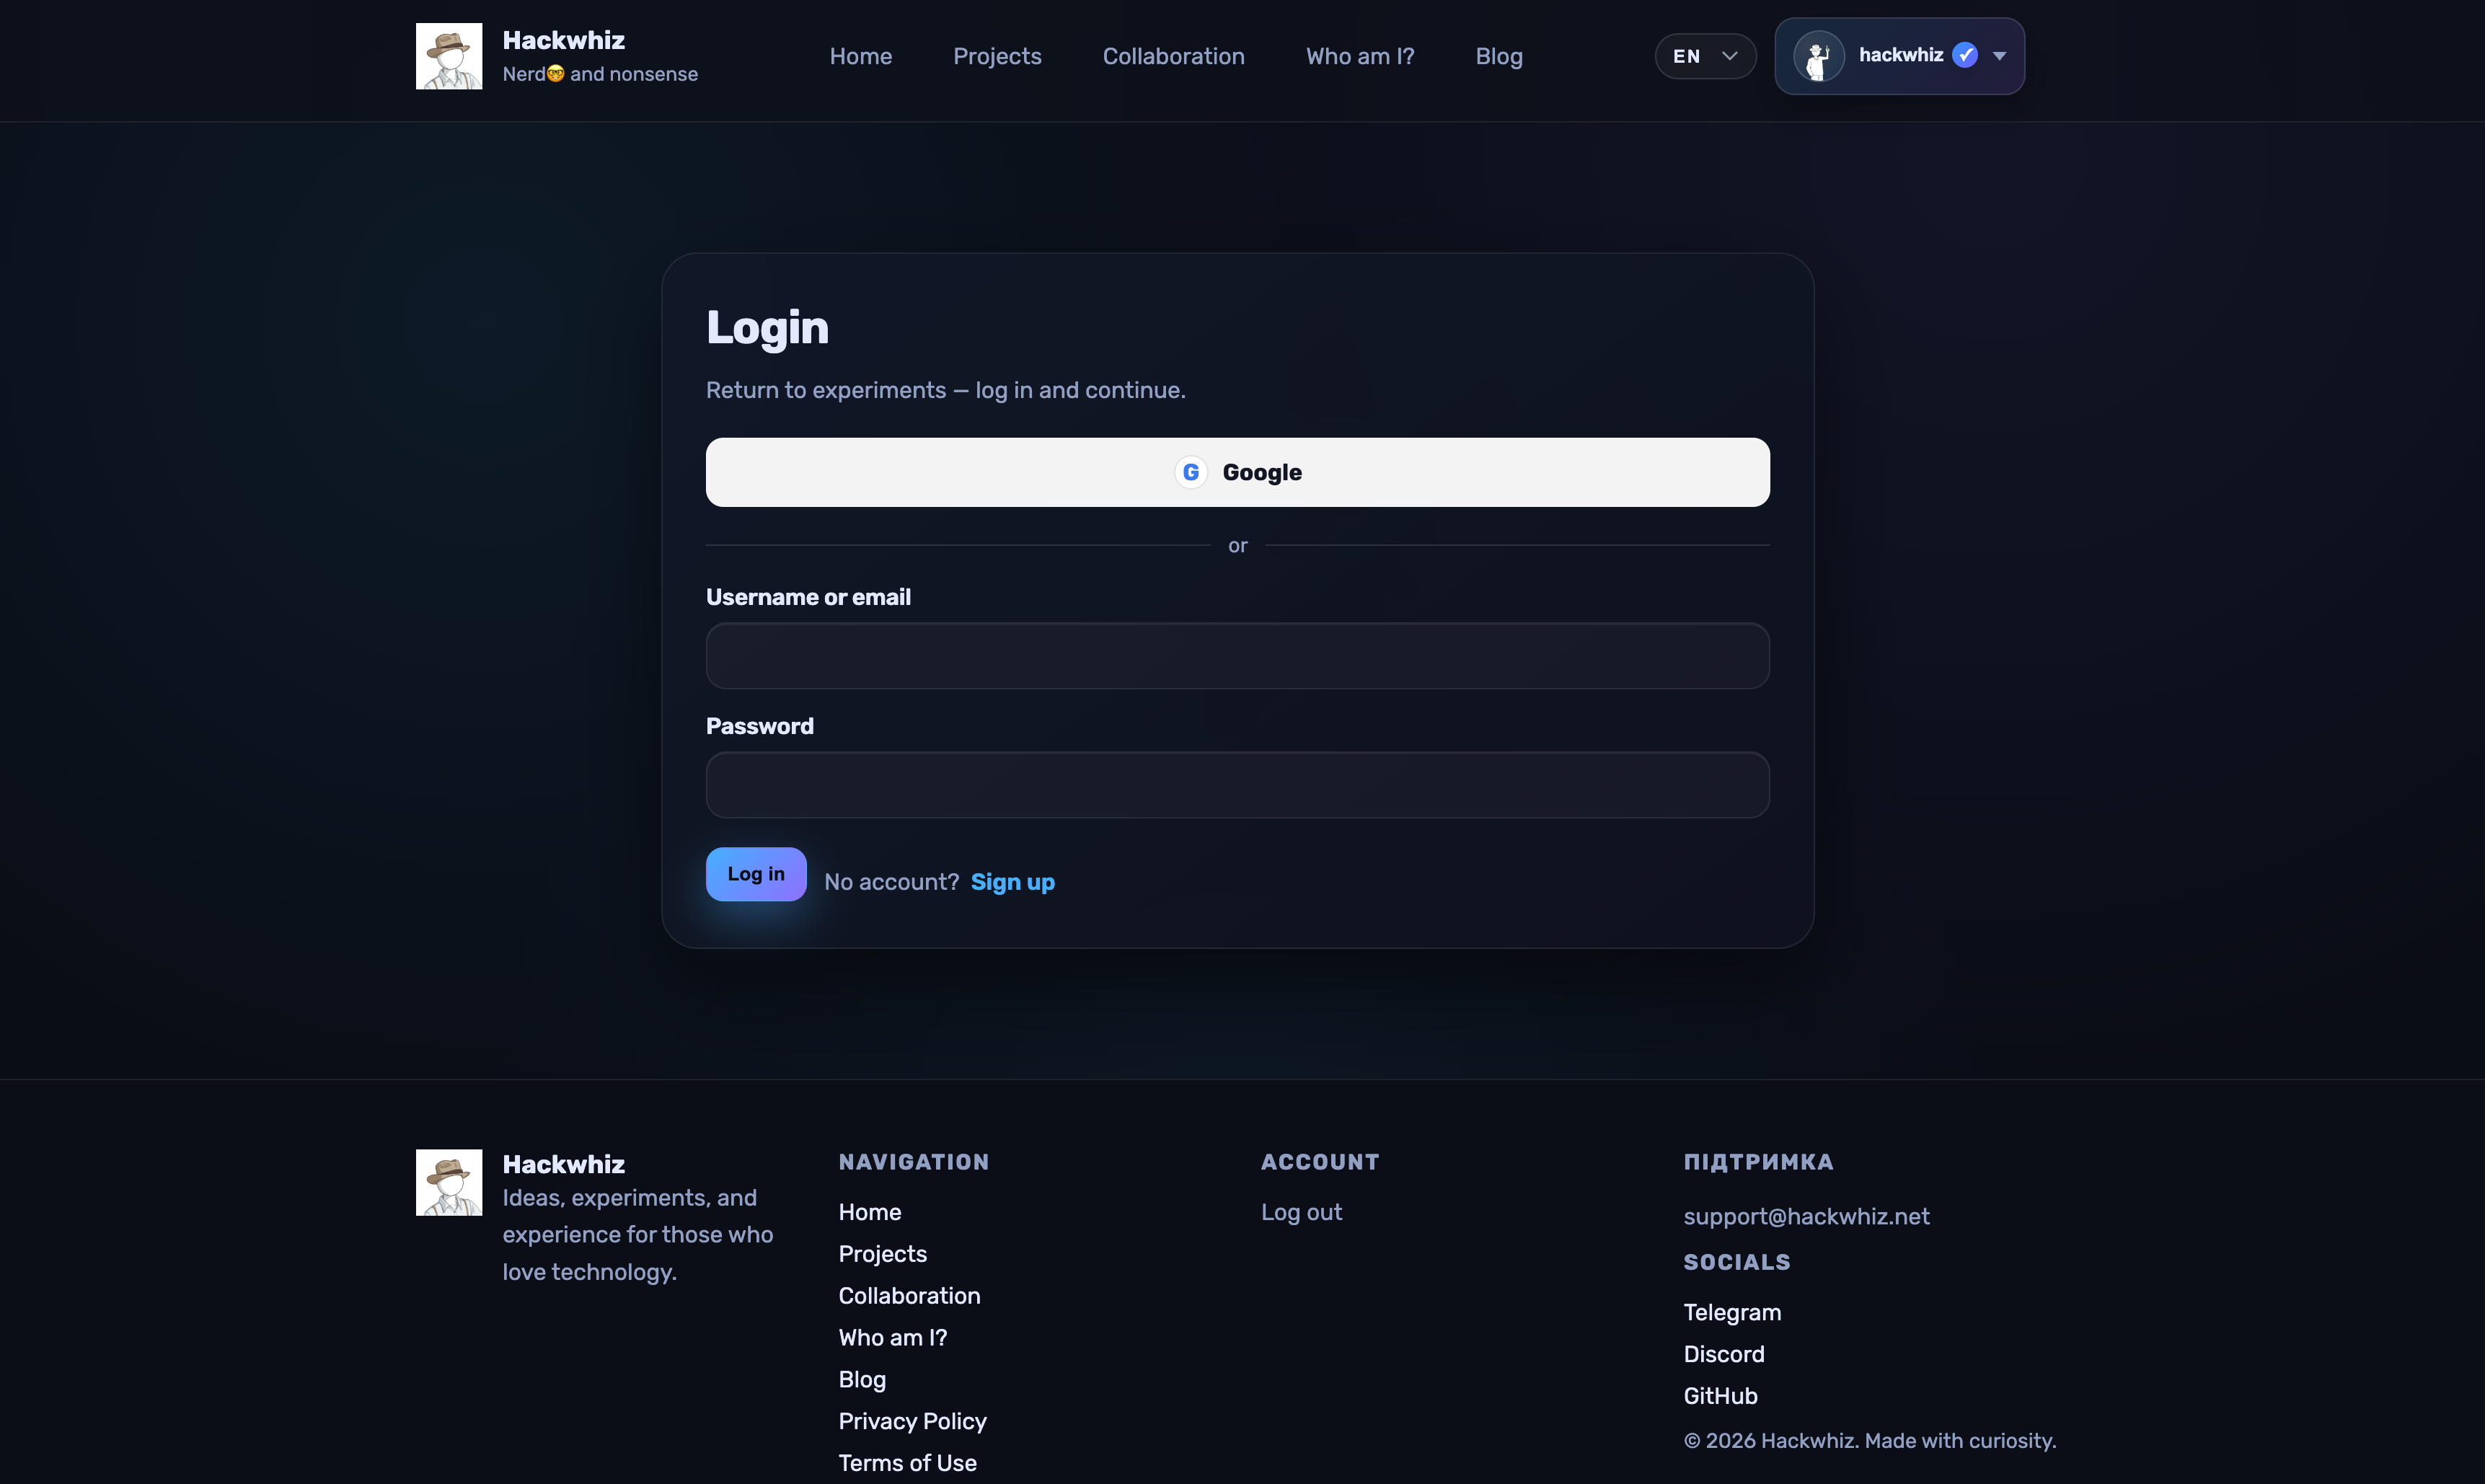
The login button is in the upper right corner. If you do not have an account yet, register on the website. After logging in, your details will appear in the application header.
The rest of the documentation assumes you are logged in.
Public Catalog and Project Import#
Click Public Projects in the sidebar to open the built-in public project catalog directly inside the application.
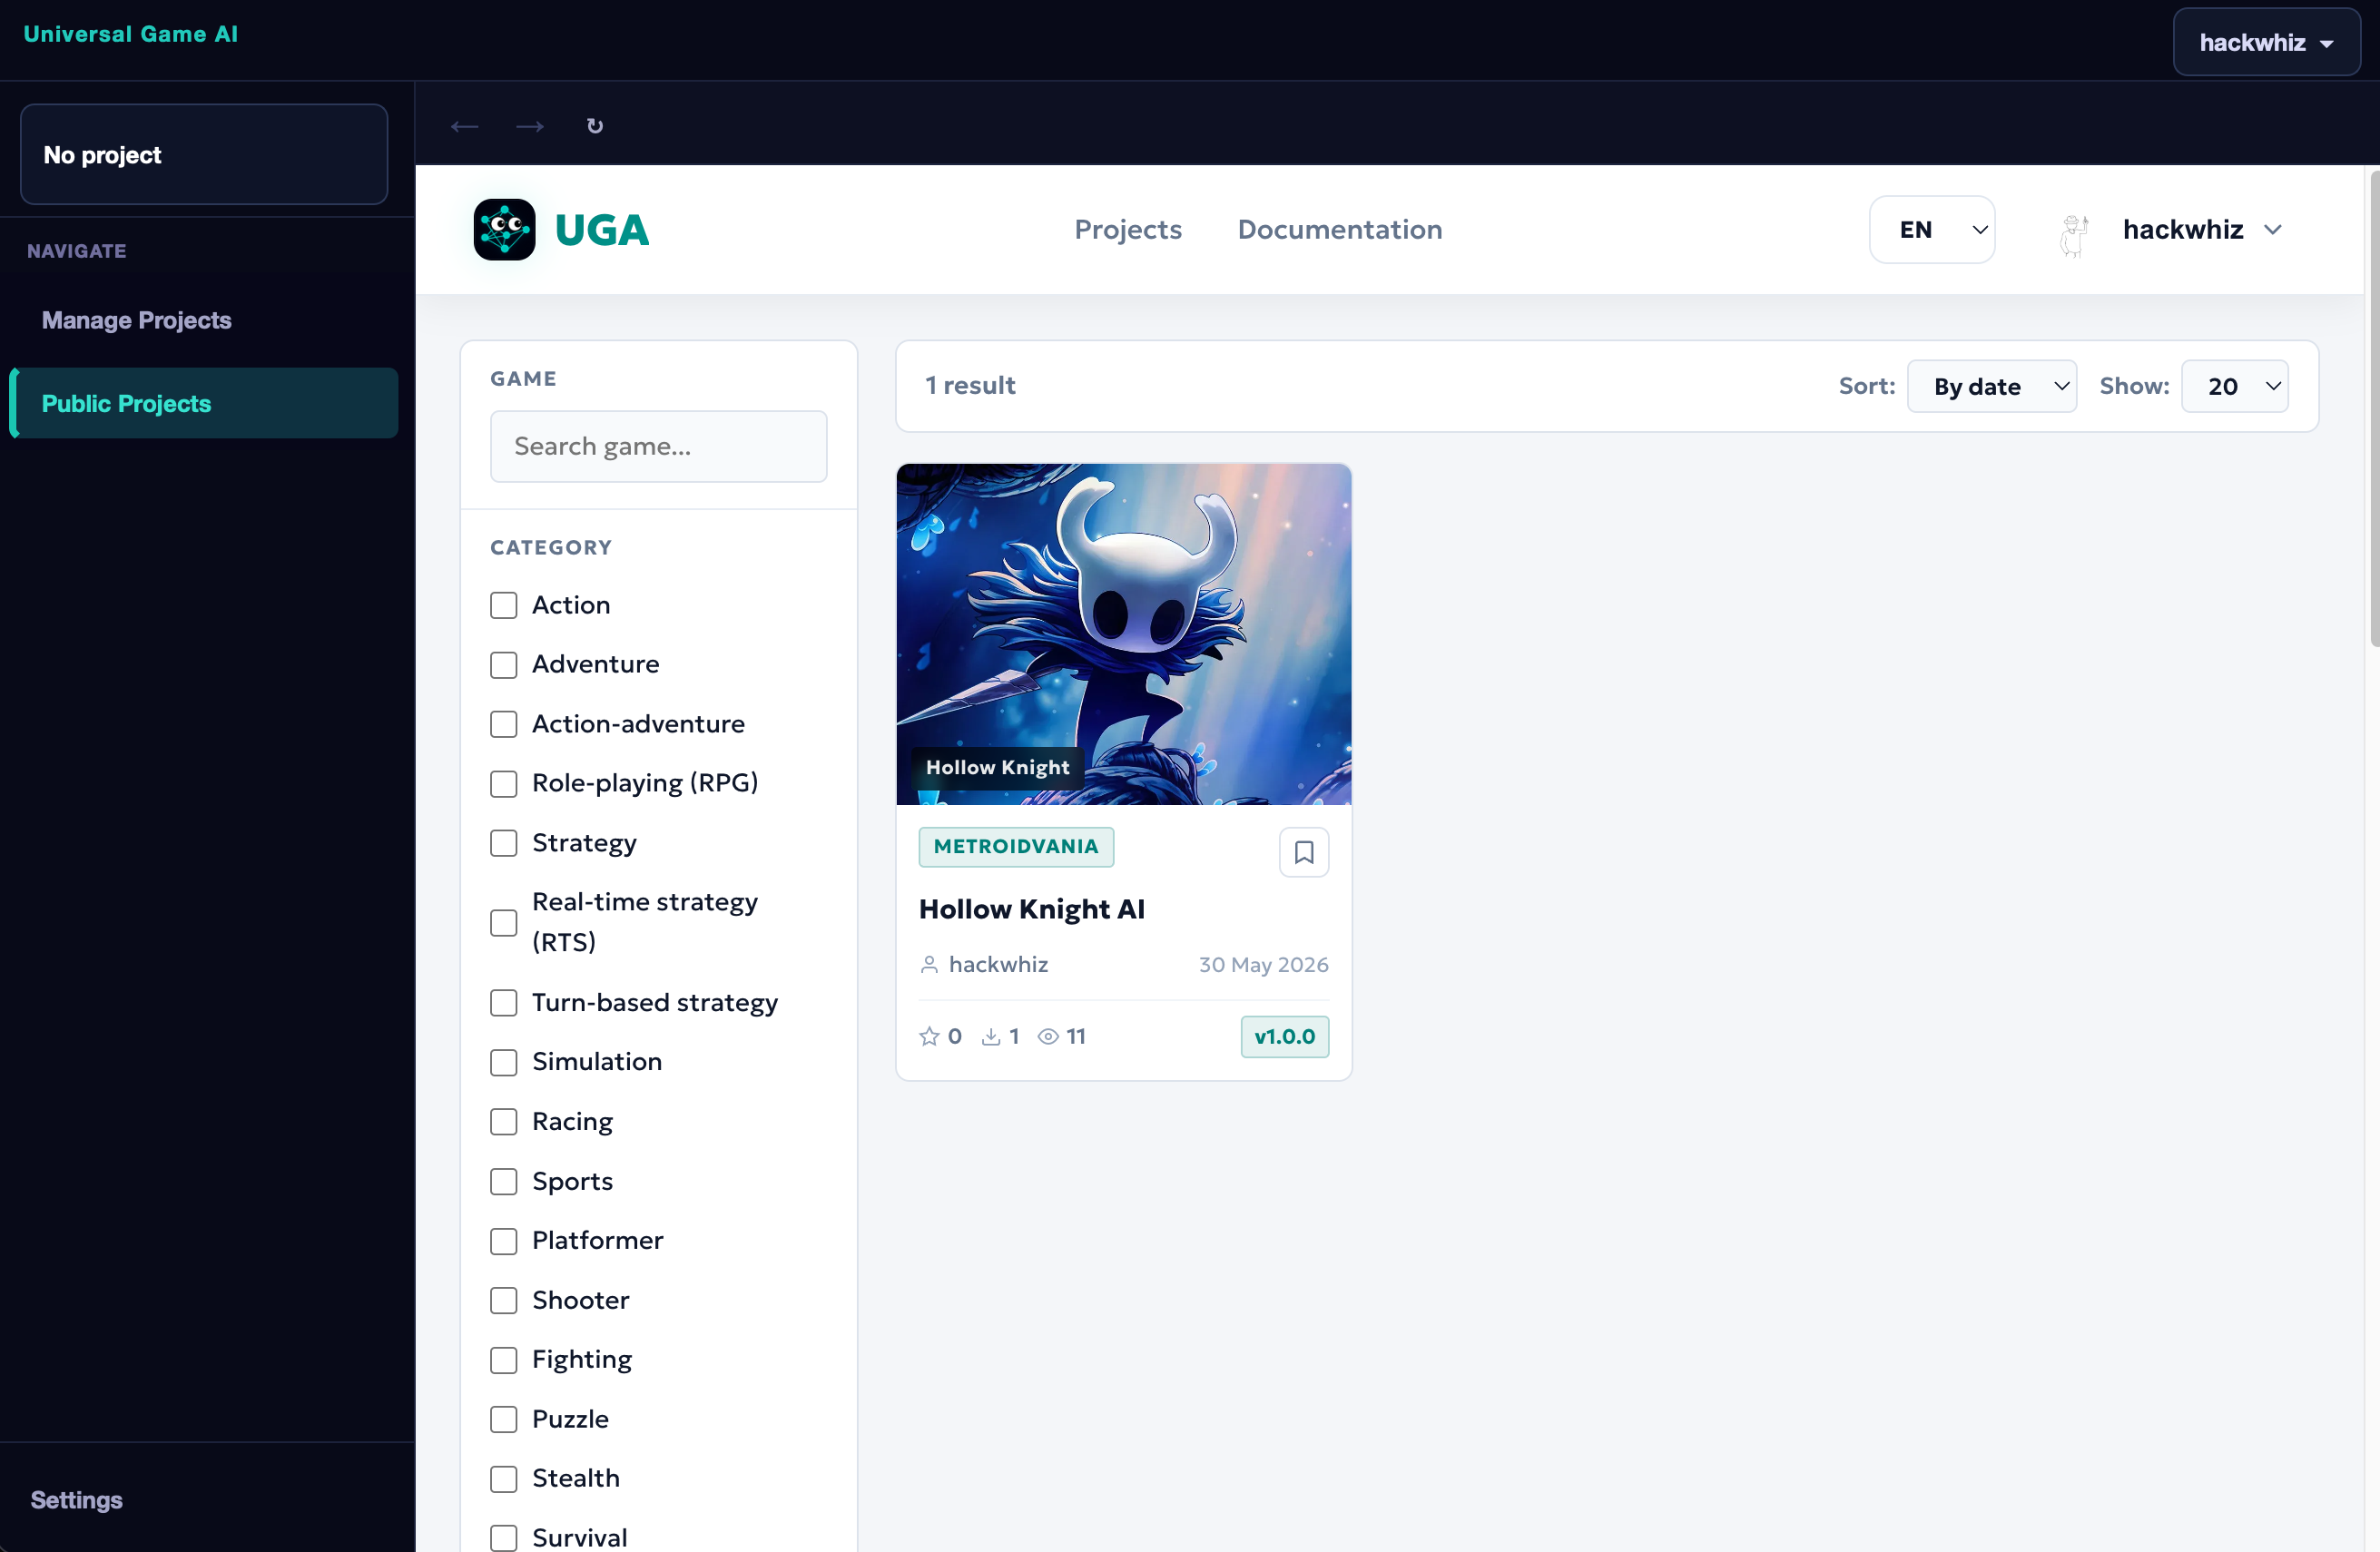
Here you can browse all available projects, filter them by game or genre, and find the agent you need.
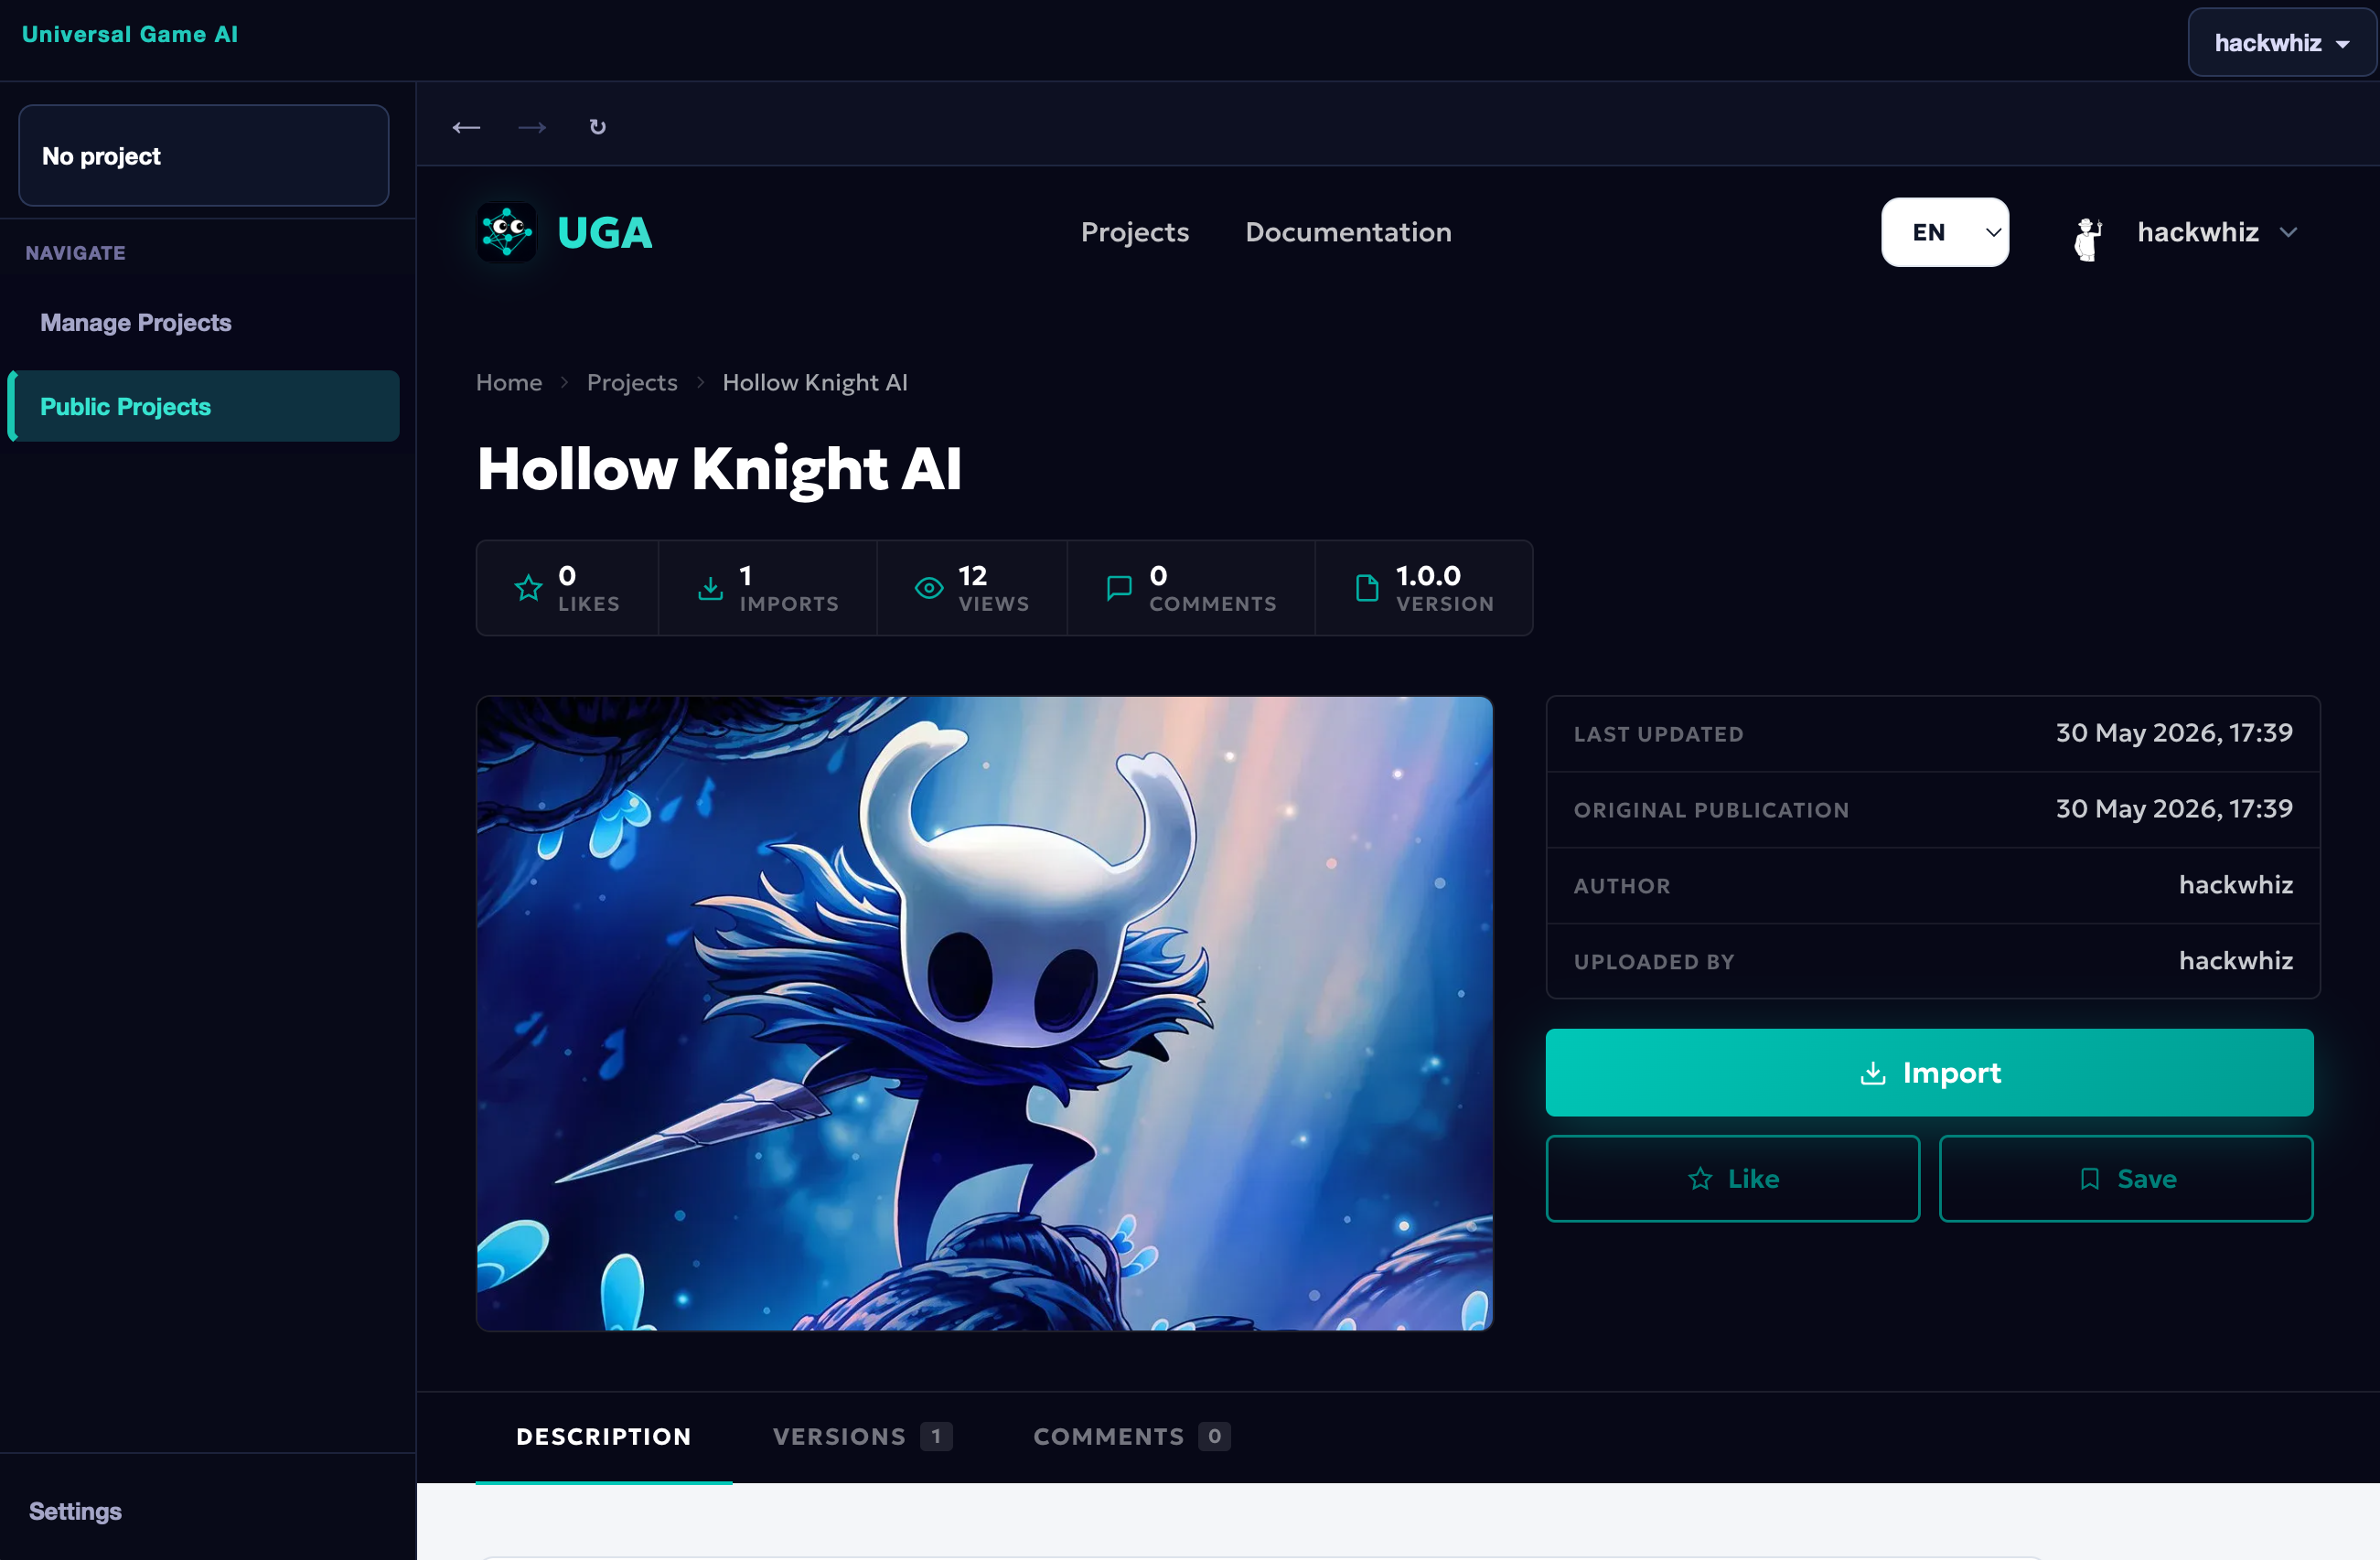
Click on a project to open its detail page. The Import button downloads the project into your application — it will immediately appear in the Imported Projects section on the Manage Projects page.
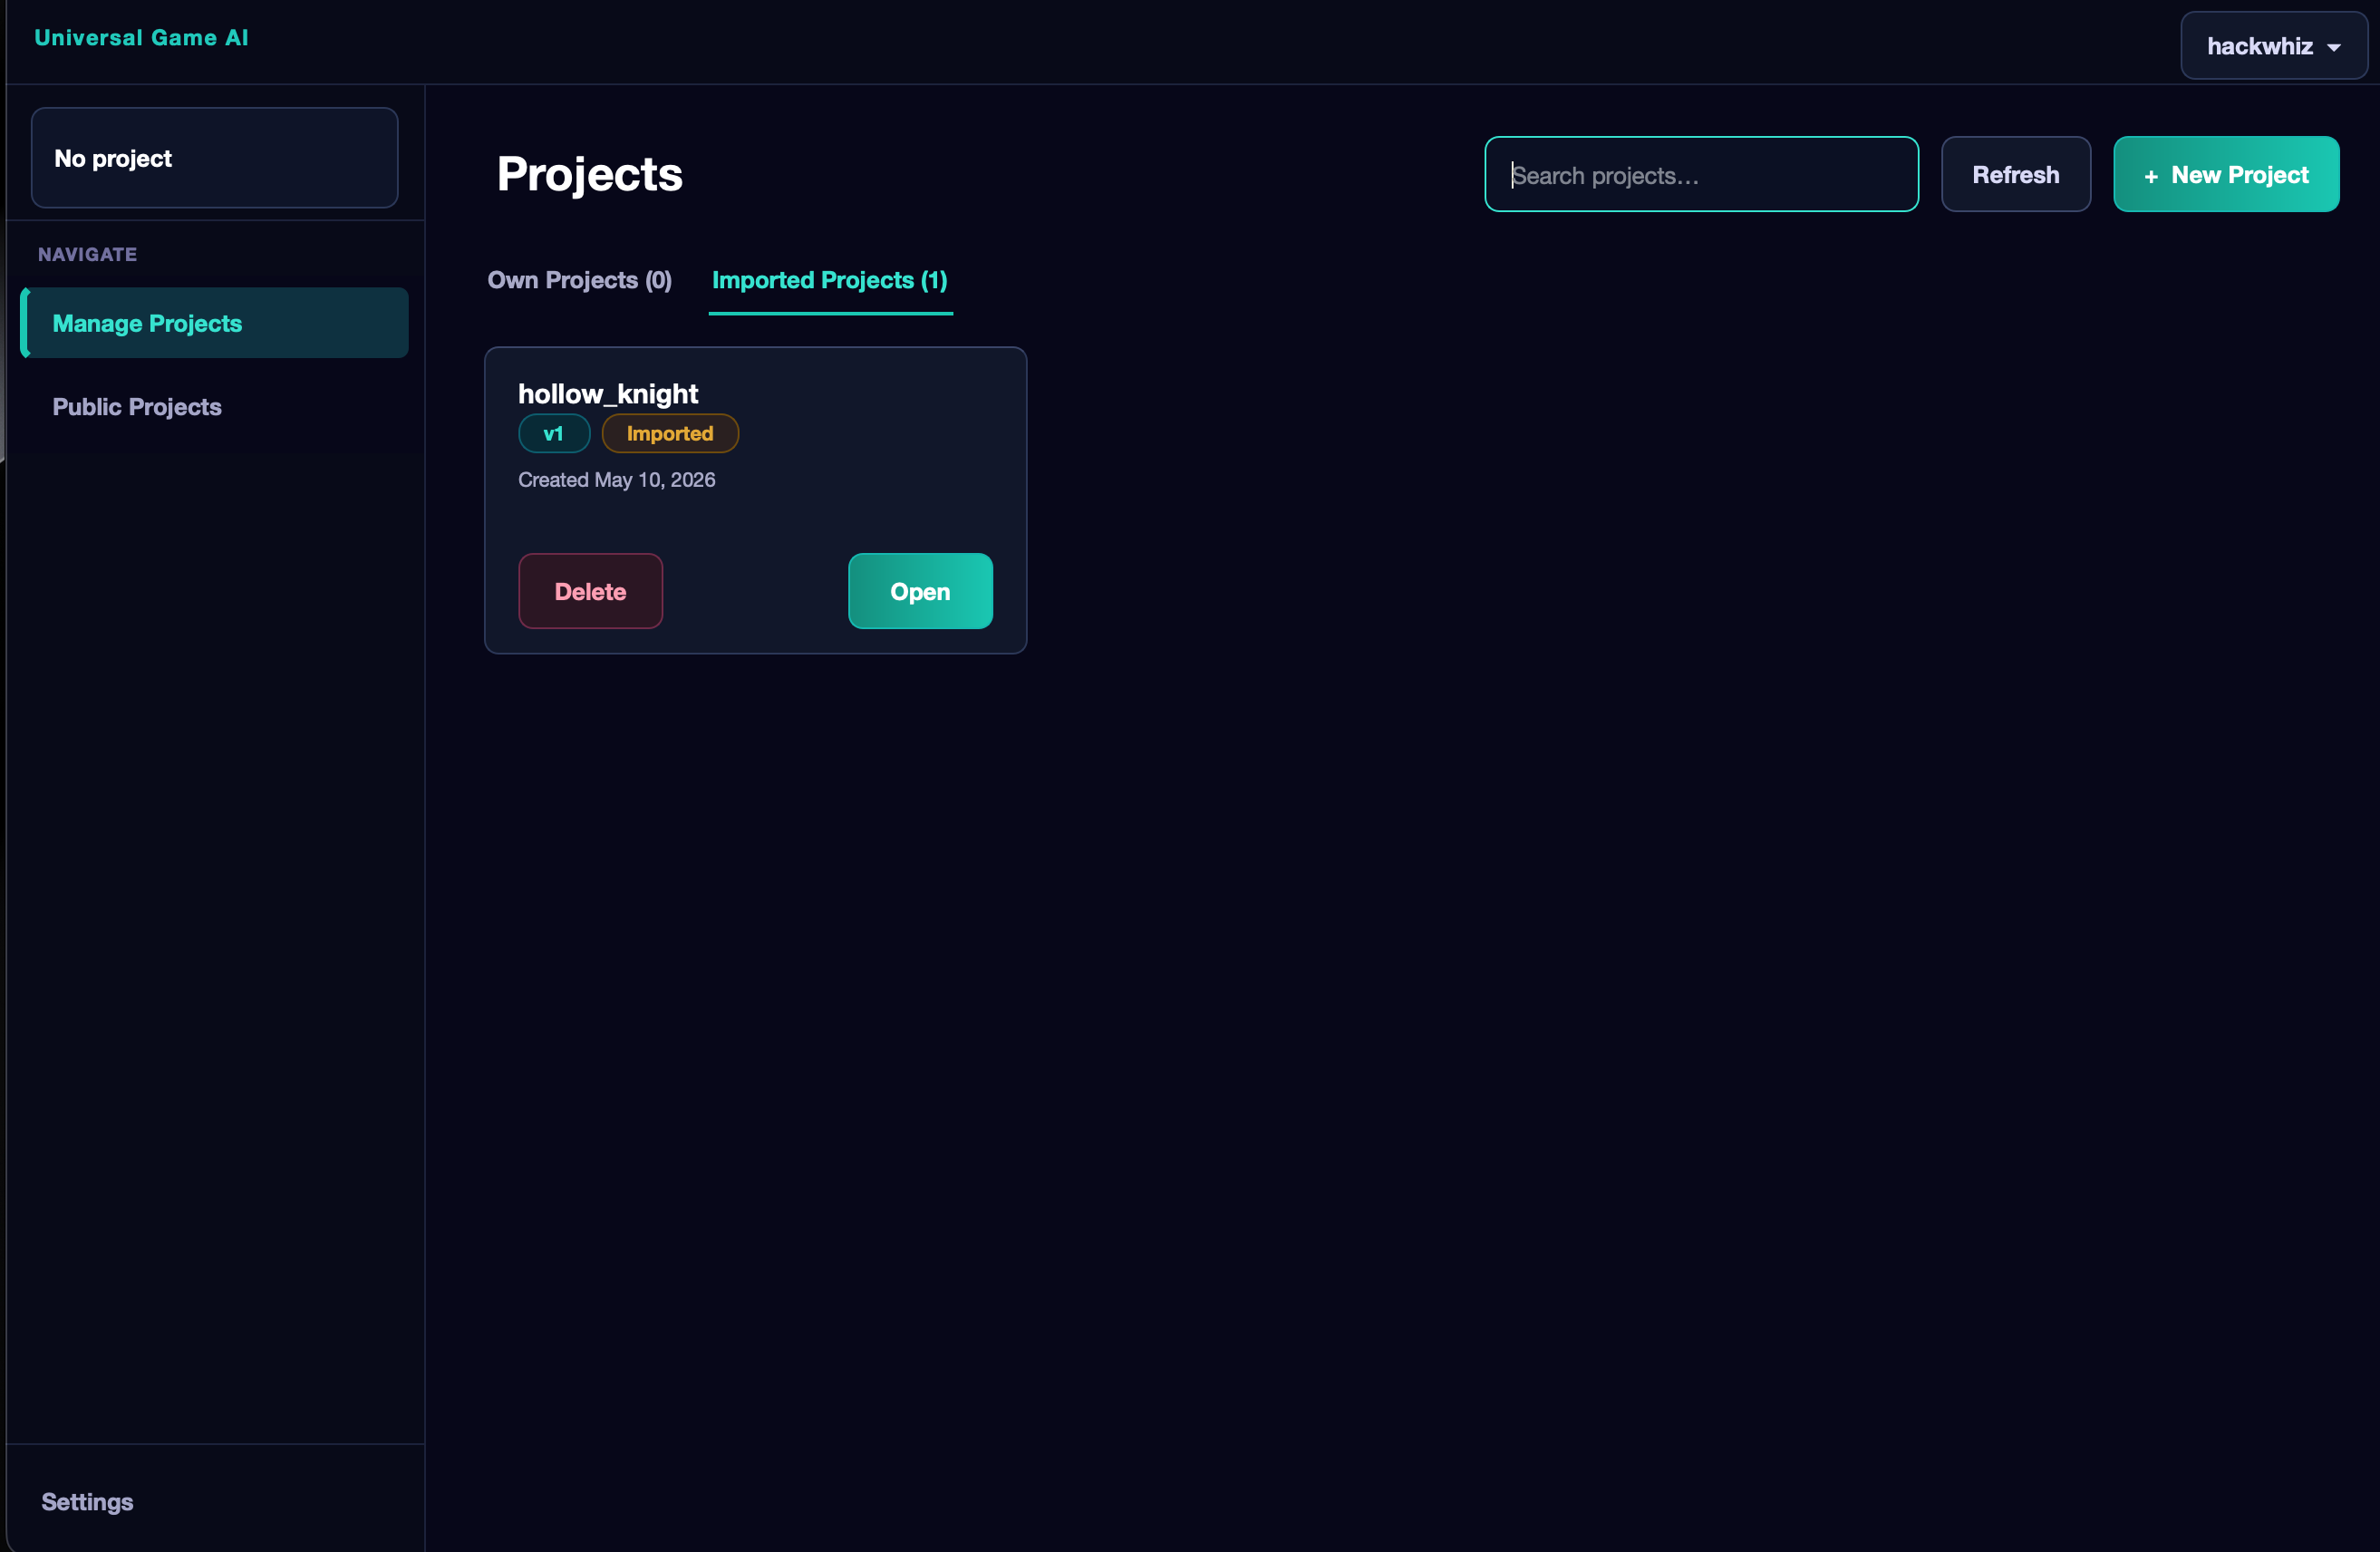
After importing, click Open on the project card to open it and start using it.
Running an Imported Project#

An imported project opens directly on the Inference tab. Here is what you can configure:
Model Selection#
The top dropdown selects the trained model. An author may provide one or more models — of different sizes or trained for different tasks. A good author explains the purpose of each model in the project description or in the model names. Choose the one that fits your scenario.
Game Window#
In the next list, select the game window that the neural network should see. It is very important to choose the actual game window and not any other window. If a recently opened window does not appear in the list — click Refresh.
Device#
Here you select which device the agent will run on:
- CPU — the central processing unit. Always available, but significantly slower than graphics accelerators. Suitable when there is no GPU or for lightweight models.
- CUDA — for supported discrete NVIDIA GPUs. The best option for training and running if your card supports CUDA.
- MPS — for Macs on Apple Silicon (M1-M5 and newer). Allows using the graphics accelerator of the built-in GPU.
Pause Key#
Next to the device selection is the key that pauses or resumes the agent. The default is P. To change it — click Change and press the desired key on the keyboard.
The pause key only becomes active after clicking Start Inference.
Active Capabilities#
This is the list of action sections the agent can perform. Checkboxes allow enabling or disabling individual action groups right before launch.
This is useful, for example, if some mechanic in the game is not yet unlocked. In Hollow Knight, for instance, the dash is not obtained immediately — if you run the agent from the very start of the game, uncheck the corresponding section. How well the agent handles such restrictions depends on whether the author accounted for this during training.
Runtime Action Bindings#
This table shows all agent actions and the keys they are bound to. Since each player may have different key settings in the game, you can rebind them here — so when the agent presses a key, it performs the desired action and does not press into the void.
Select a row in the table and use:
- Re-capture Keyboard — change the keyboard key for the selected action.
- Change Mouse Button — change the mouse button (left / right / middle).
- Reset From Model — reset all bindings to the defaults recorded in the model by the author.
Thresholds#
In the far right column of the table, each binary action (keyboard key press or mouse button) has a threshold field — a number from 0 to 1. This is the minimum probability at which the agent considers the action should be performed. The standard value is selected automatically after training, but you can adjust it manually:
- Lower the threshold if the agent performs a certain action too rarely.
- Raise it if it performs the action too often or incorrectly.
The Save Thresholds and Reset Thresholds buttons let you save your threshold values or revert to the values from the model.
Launch#
Click Start Inference. The application begins a 5-second countdown — during this time switch to the game window. After that, the agent starts playing.
The Control block shows the current state: number of processed frames, frame rate (FPS), and number of actions sent.
Below is the Inference log — the agent's operation log, which can be expanded for detailed information.
To stop the agent, click Stop Inference or press the pause key.
If you enjoyed the project — support the author with a like on the project page in the catalog.
Creating Your Own Project and Training an Agent#
Creating a Project#
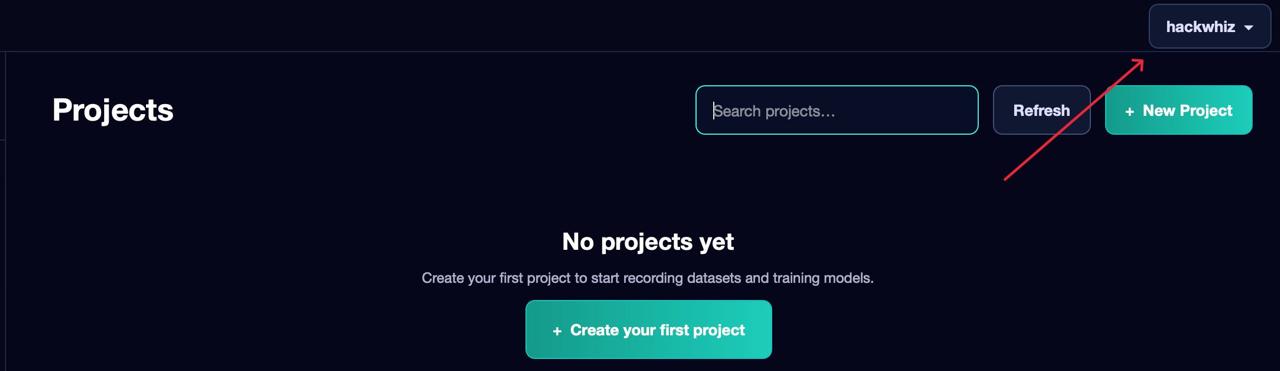
Go to Manage Projects and click + New Project.
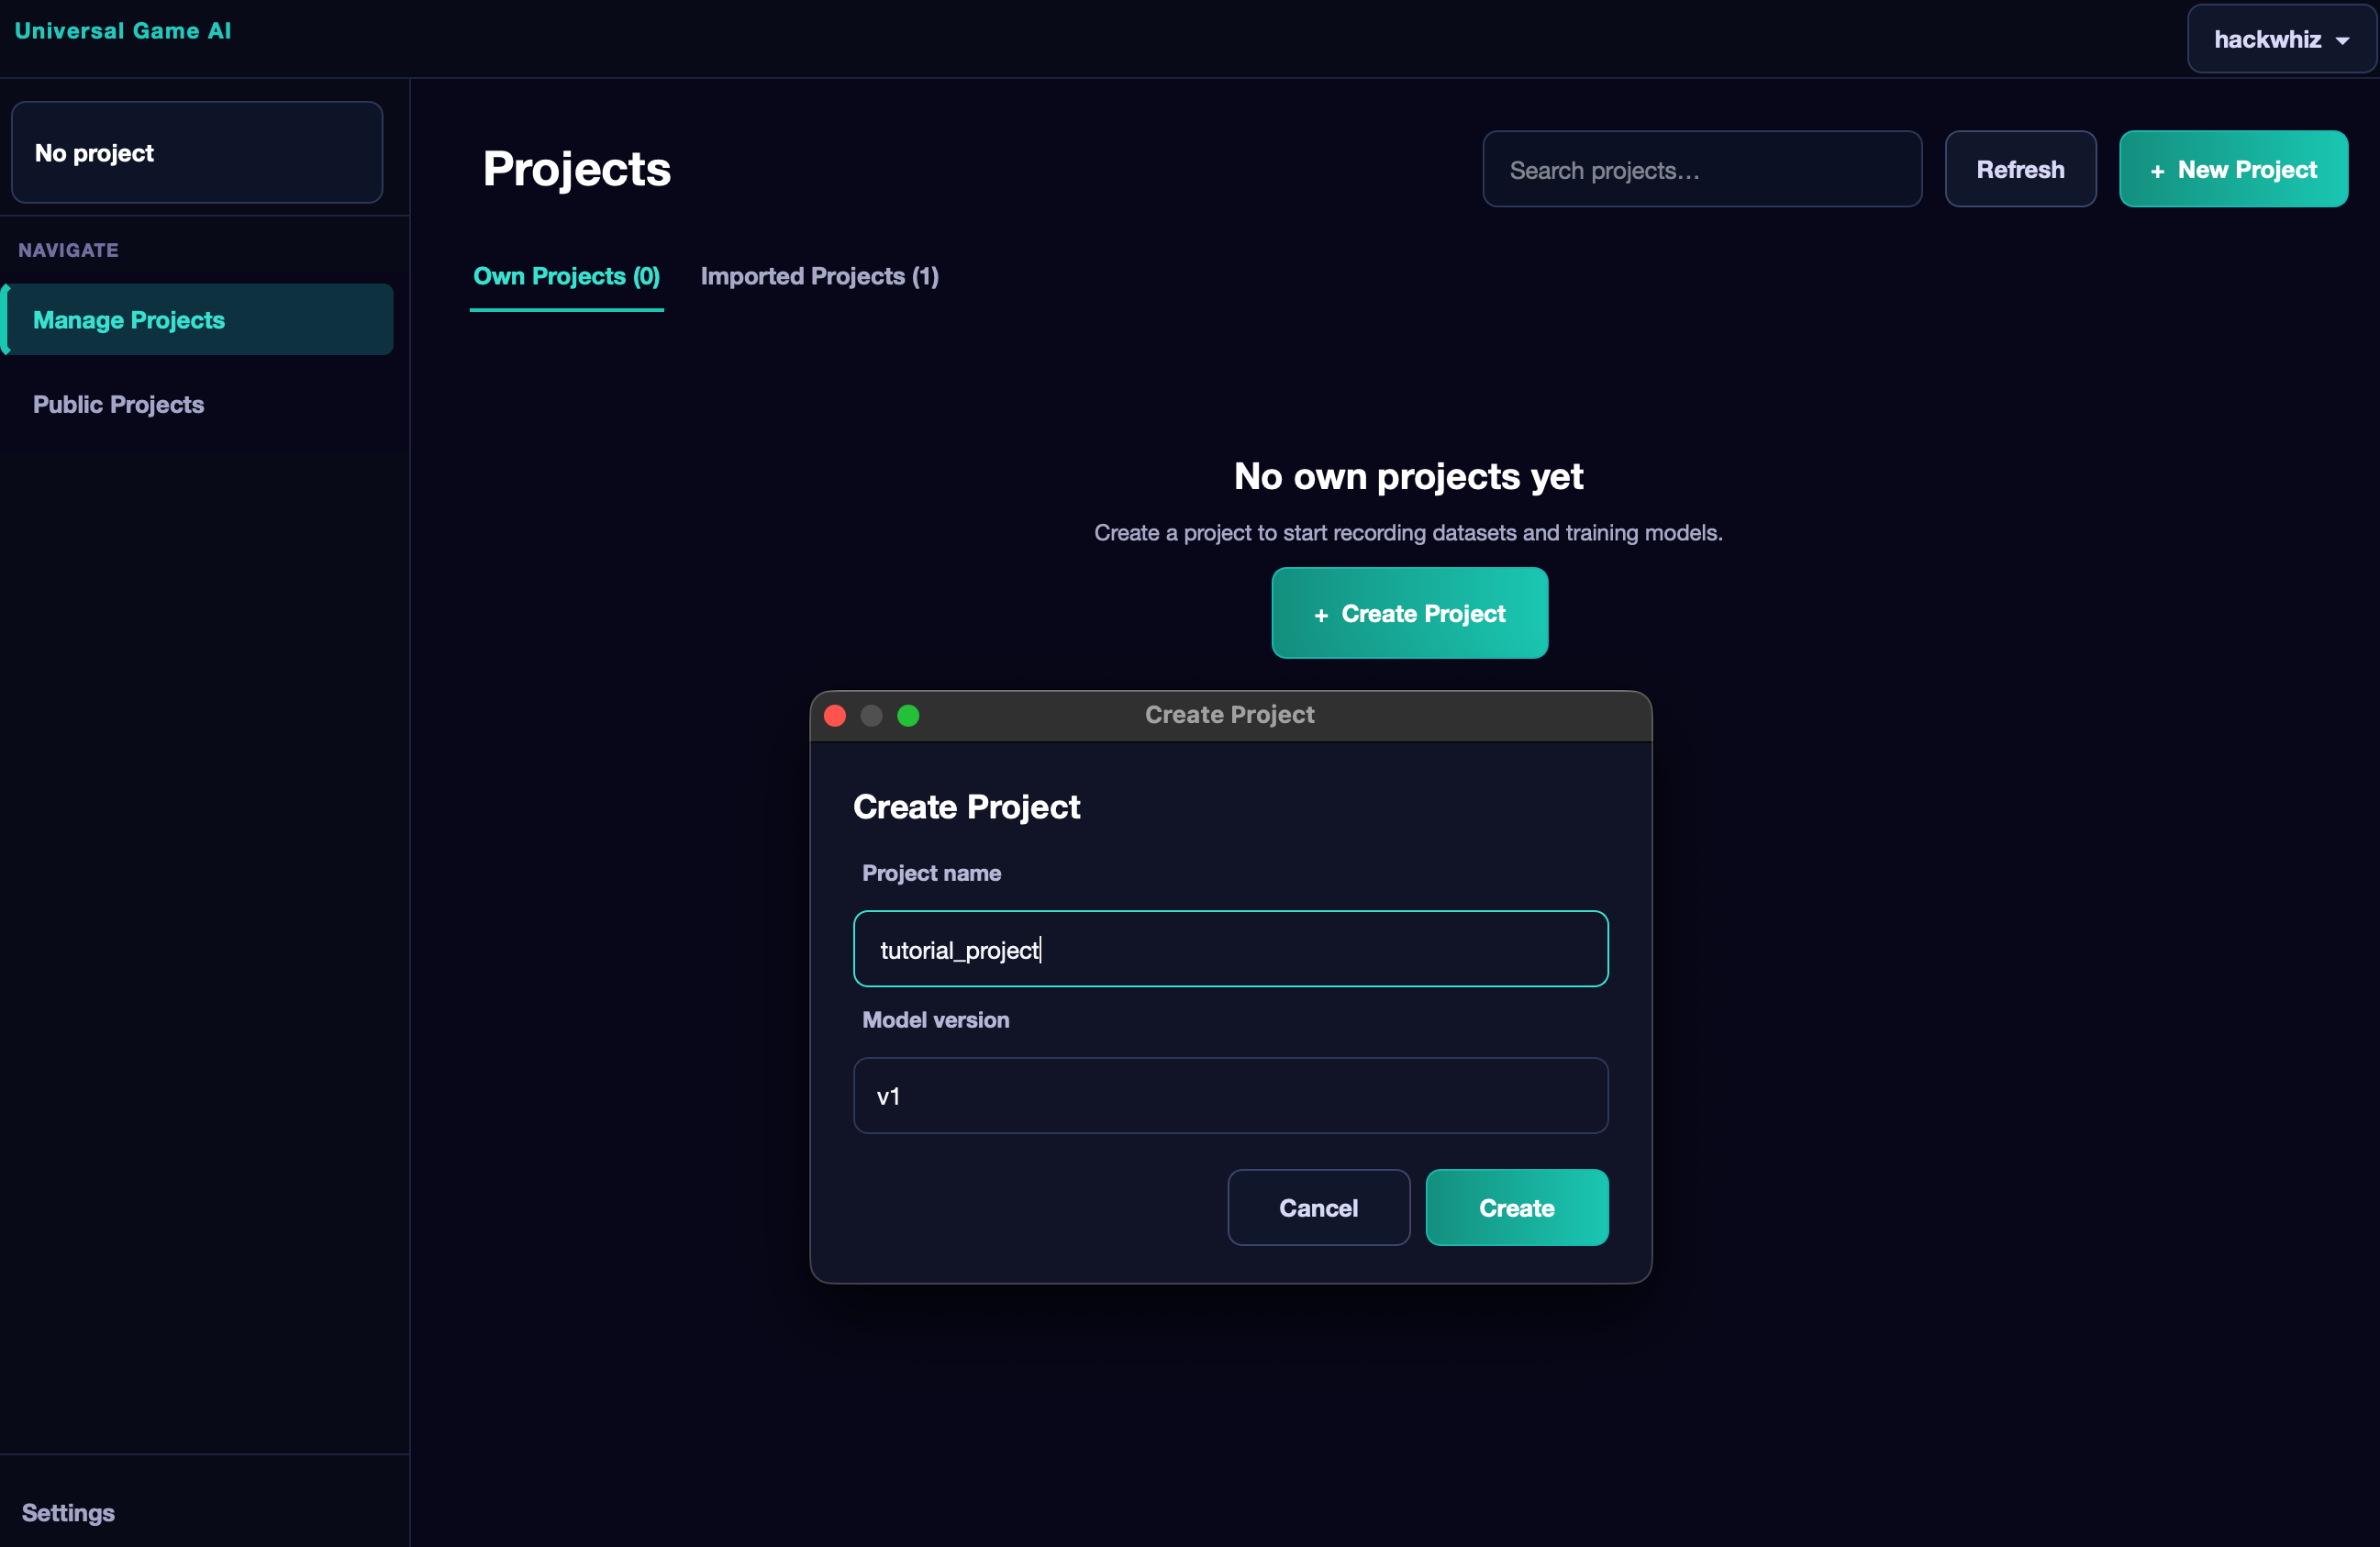
Enter the project name and choose the Mimiq model version. Currently only the first version is available, but new ones may appear in the future — always choose the latest.
After clicking Create, the project will be created and you will be inside it.
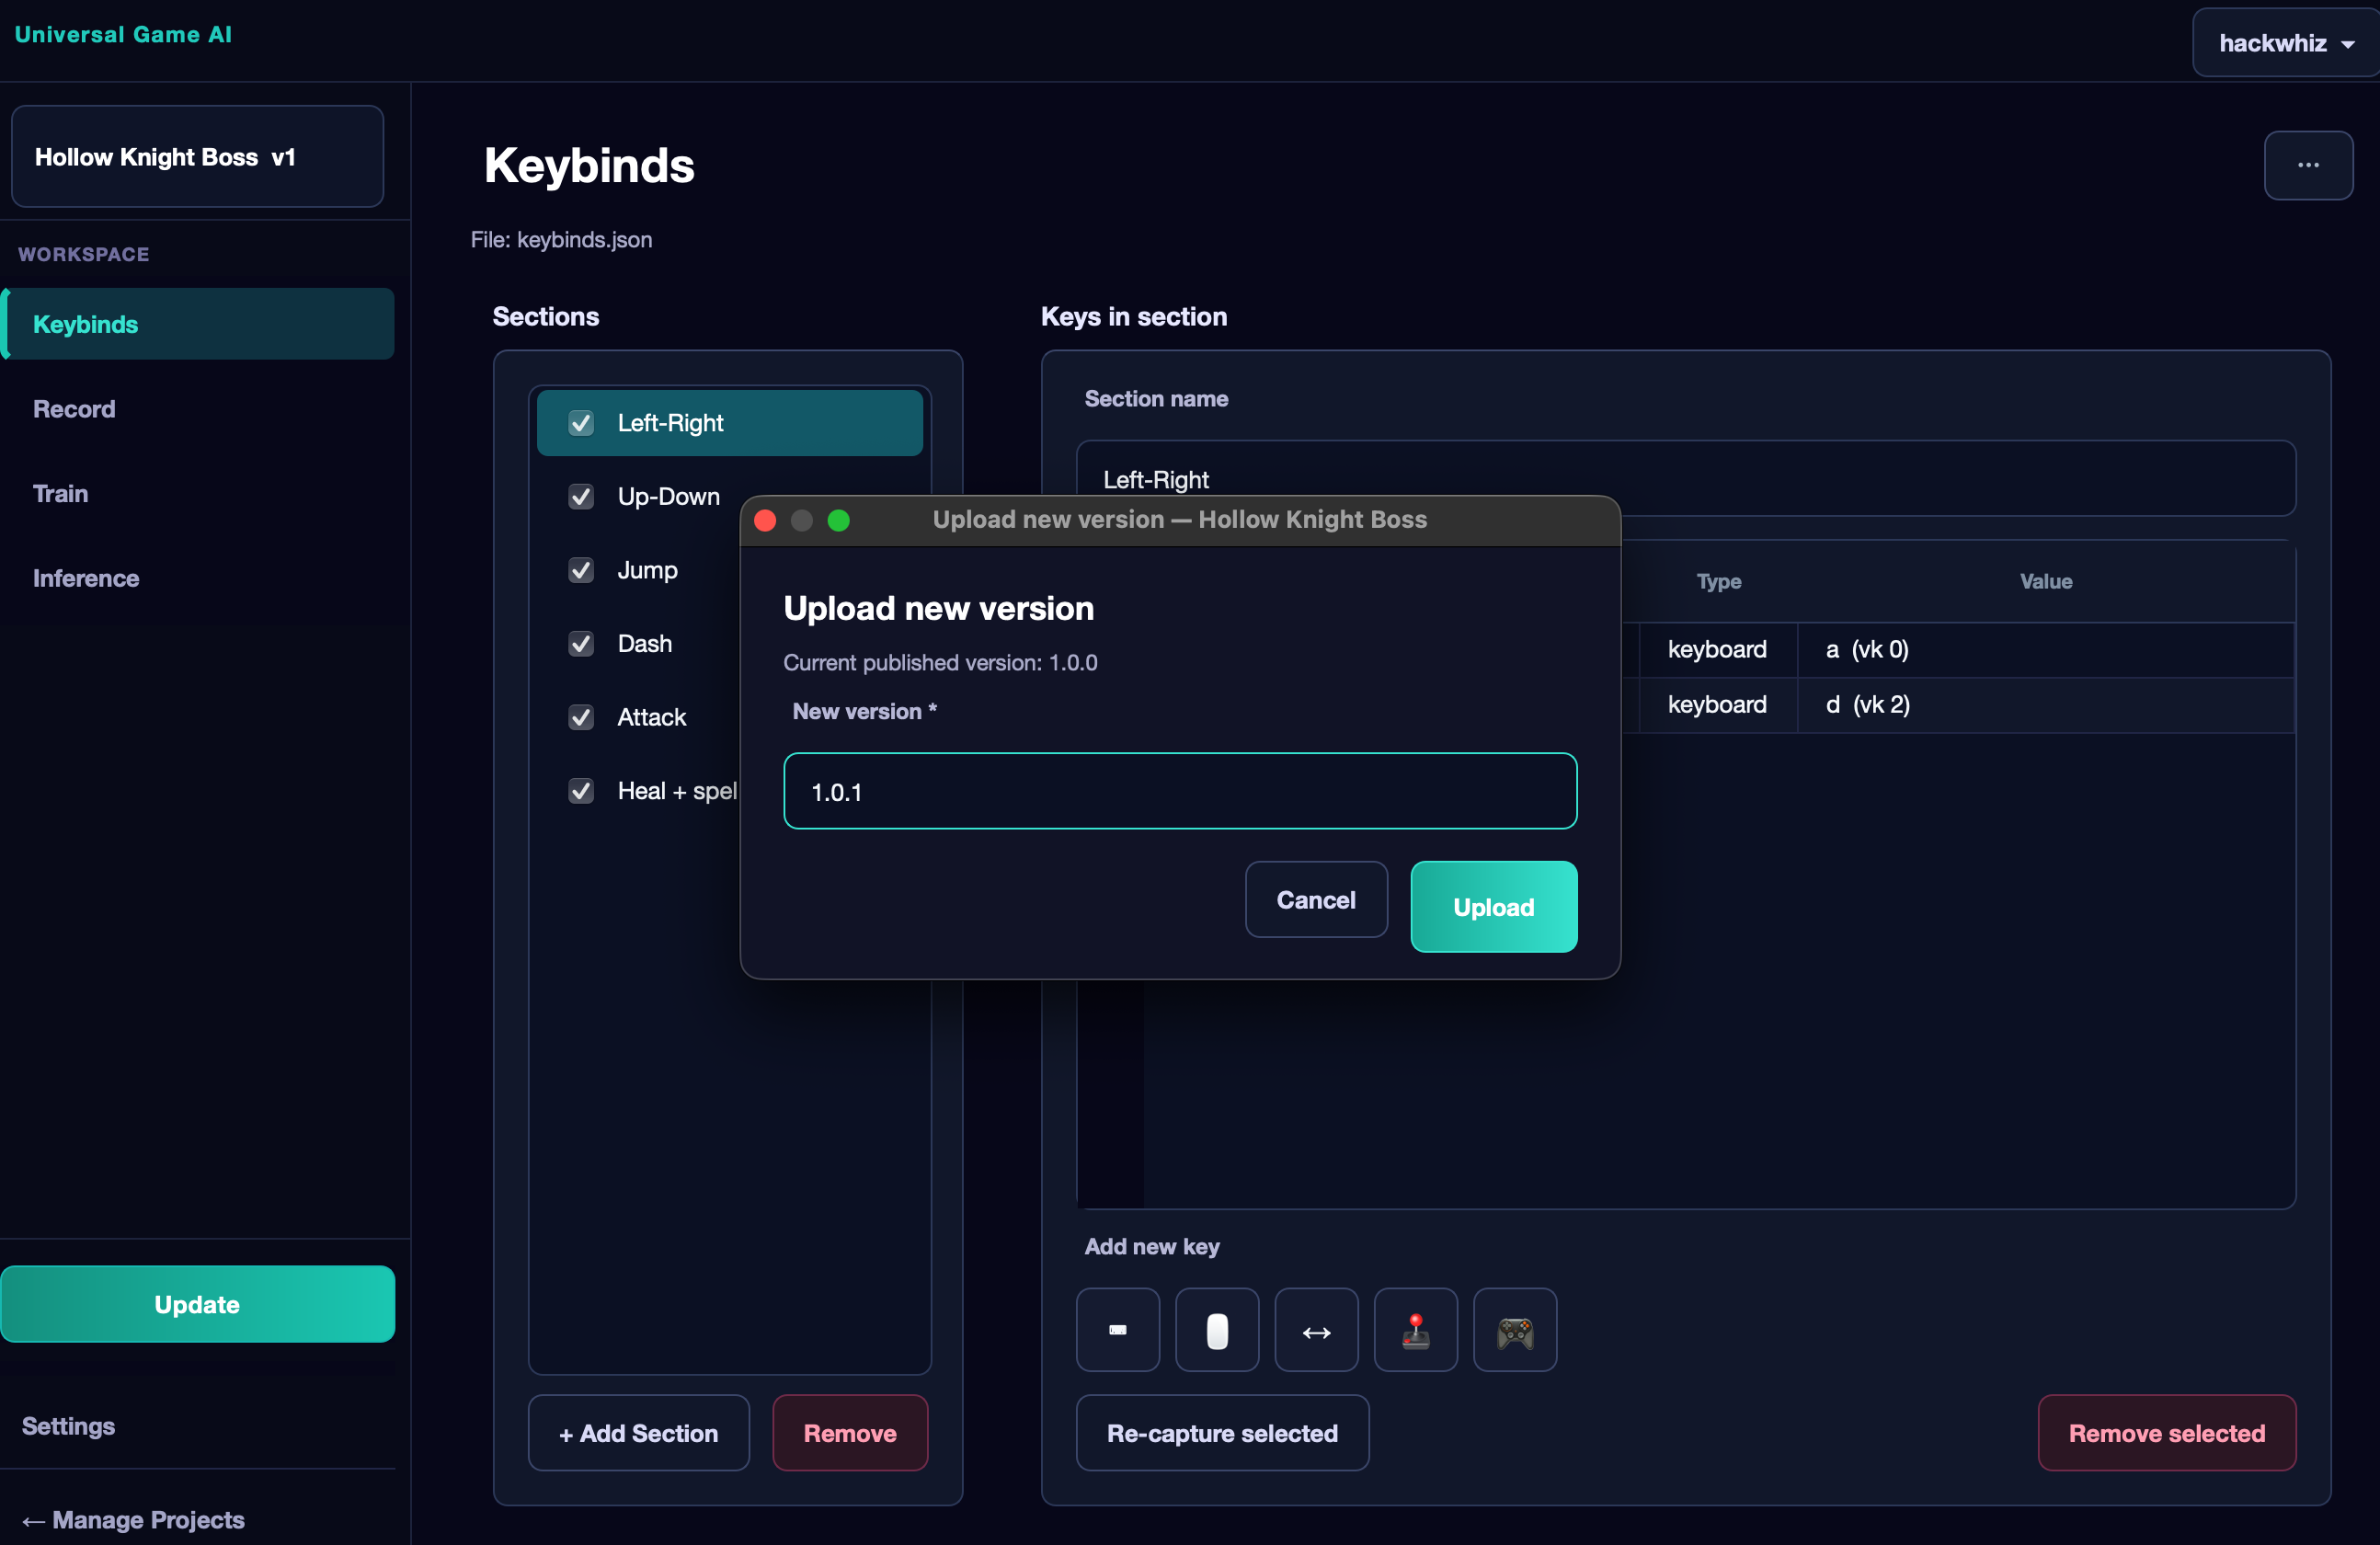
The Keybinds Tab#
The first thing to do after creating a project is configure Keybinds. One project is designed for one game, and here you describe what actions the agent can perform and which keys correspond to them.
The agent reads data from the keyboard, mouse, or gamepad and uses this during recording and training. If the application requests permission to access input — make sure to grant it.
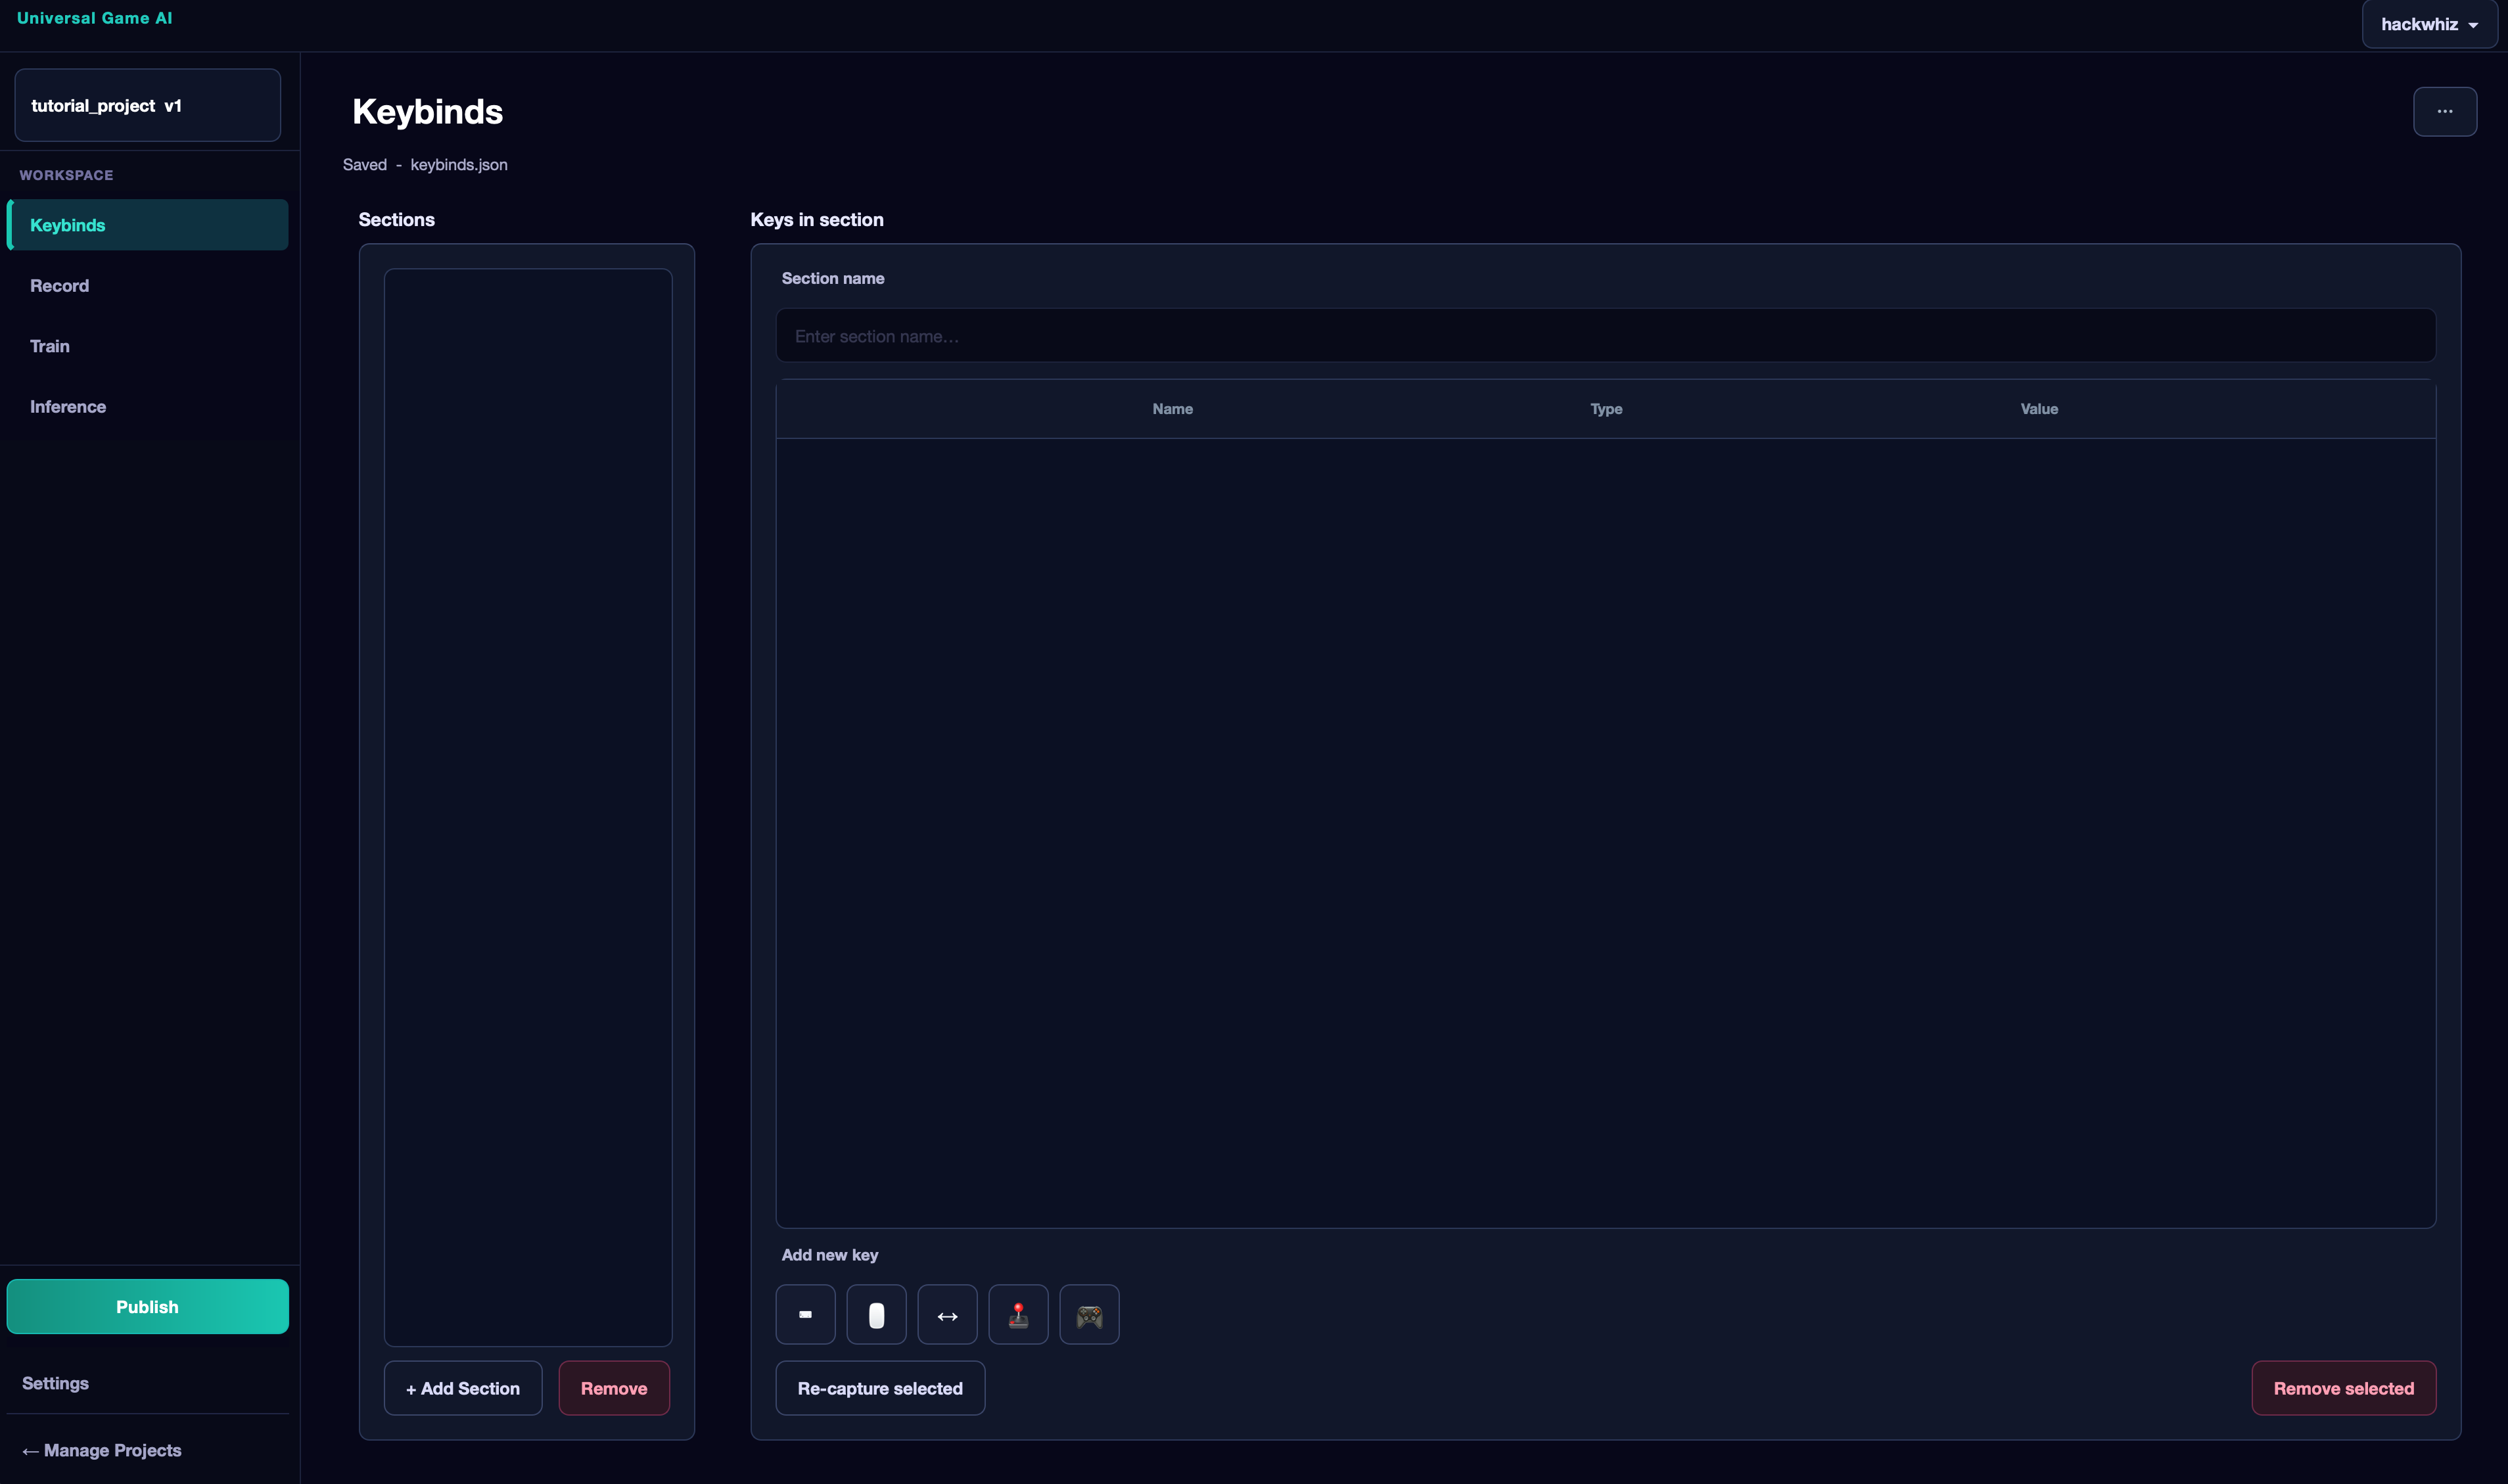
Keybinds are organized into sections. A section is a logical group of actions handled by a separate independent decision-making module of the agent. For more effective training, split actions into separate sections by purpose rather than putting everything in one.
Example for an FPS game:
Imagine a player who can move (WASD), jump (Space), shoot (LMB), rotate the camera with the mouse, and use a magic cast (F), which is not available right away.
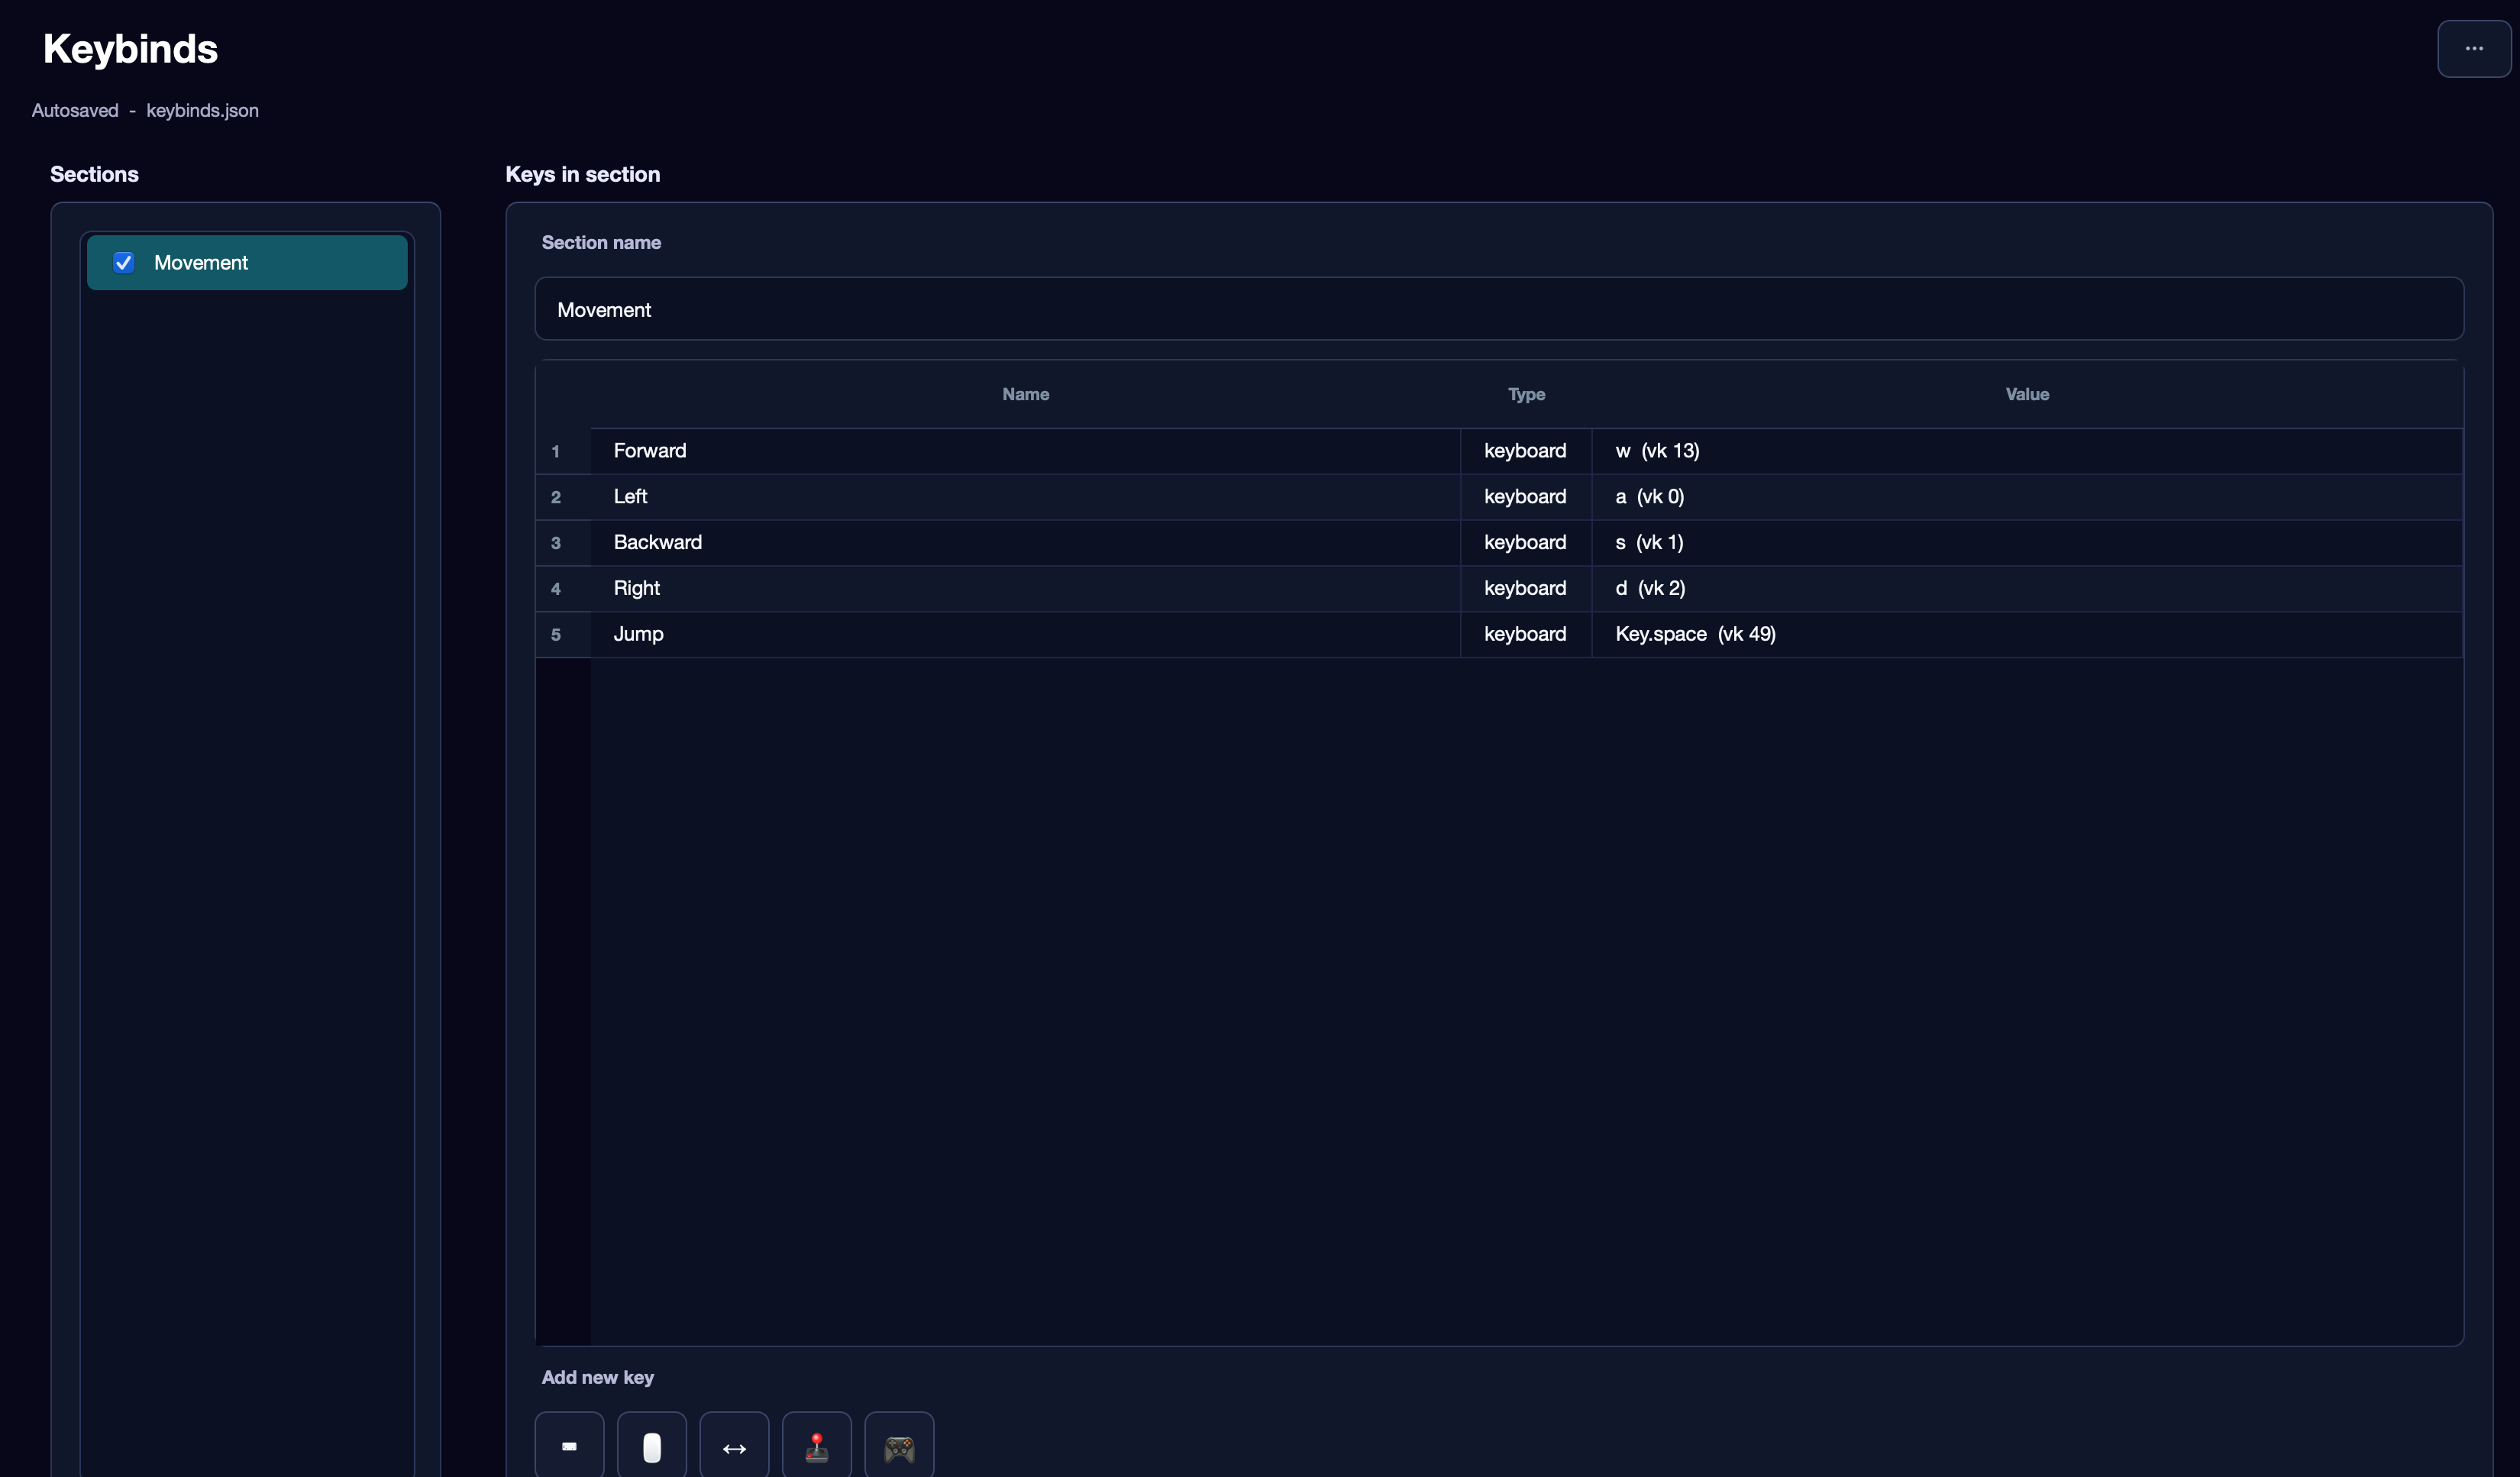
First section — Movement: W (Forward), A (Left), S (Backward), D (Right), Space (Jump). Action names in the interface are only for you — the agent does not need them.
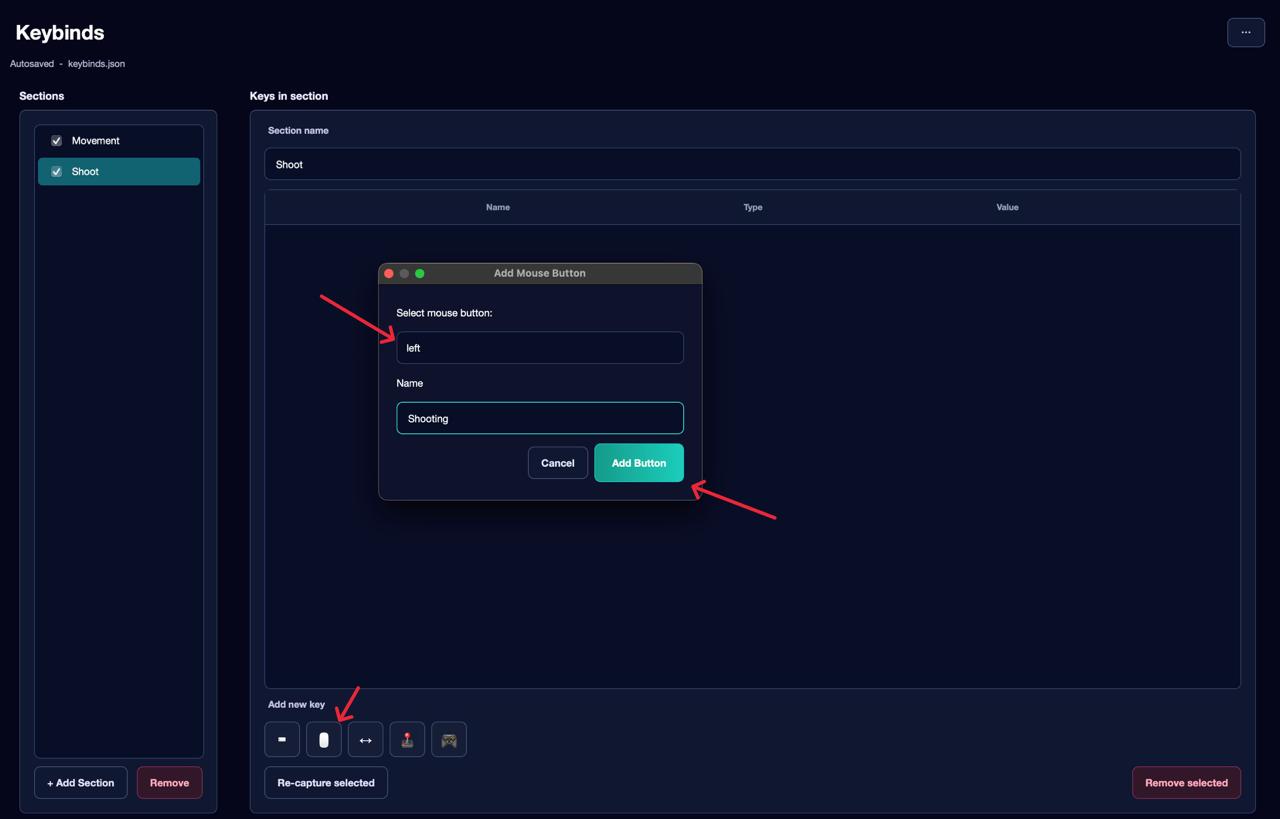
Second section — Shoot: only the left mouse button.
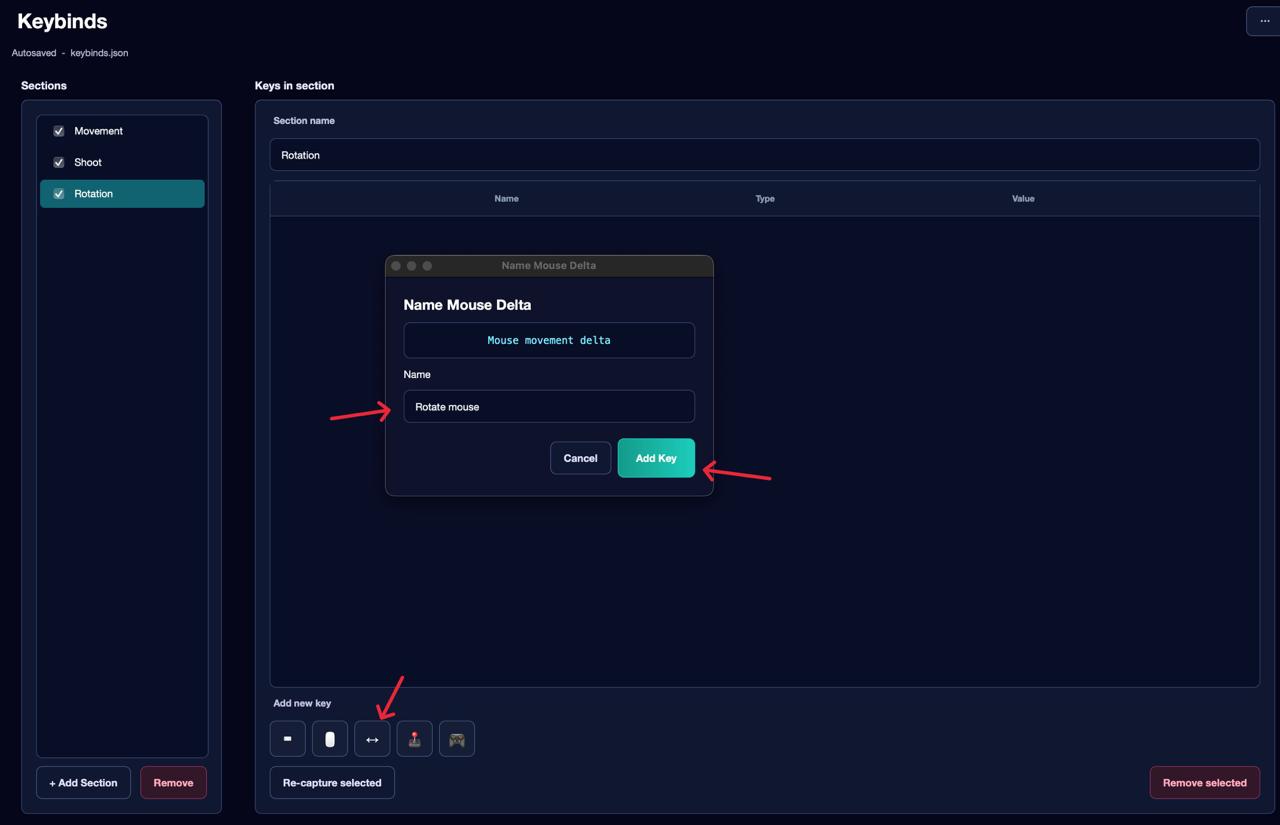
Third section — Rotation: mouse movement. Mouse movement requires its own separate section — it cannot be combined with other actions in the same section.
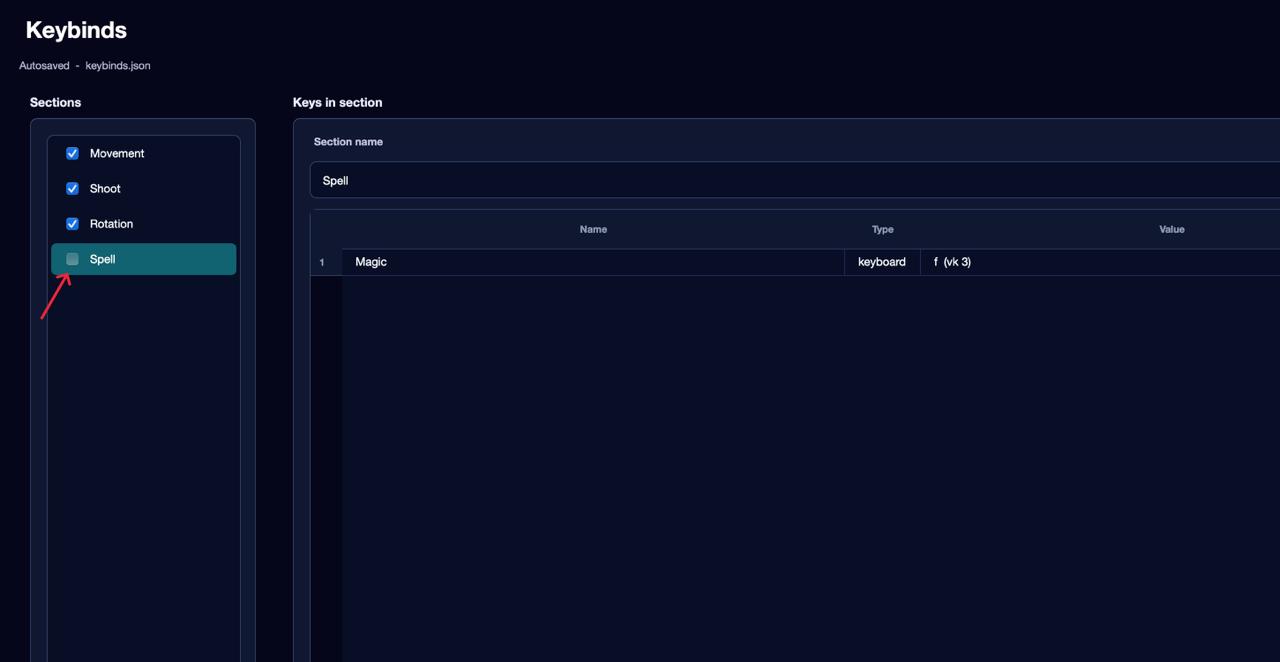
Fourth section — Spell: the F key. Since the cast is not available at first, the Enabled checkbox for this section can be unchecked. When it becomes available in the game — enable the checkbox before recording. These checkboxes tell the agent which actions are currently unlocked at this stage of training.
Besides the keyboard and mouse, you can record gamepad button presses and stick movements. This feature is currently in alpha testing — stability is not guaranteed, so the keyboard and mouse remain the primary recommended input.
The Record Tab — Recording a Dataset#
This is where the most important preparation step takes place: collecting training data.
How it works: the application takes a screenshot of the game window and records which actions you performed at that moment. Based on these pairs — image and corresponding action — the agent will later learn to understand what to do and when.
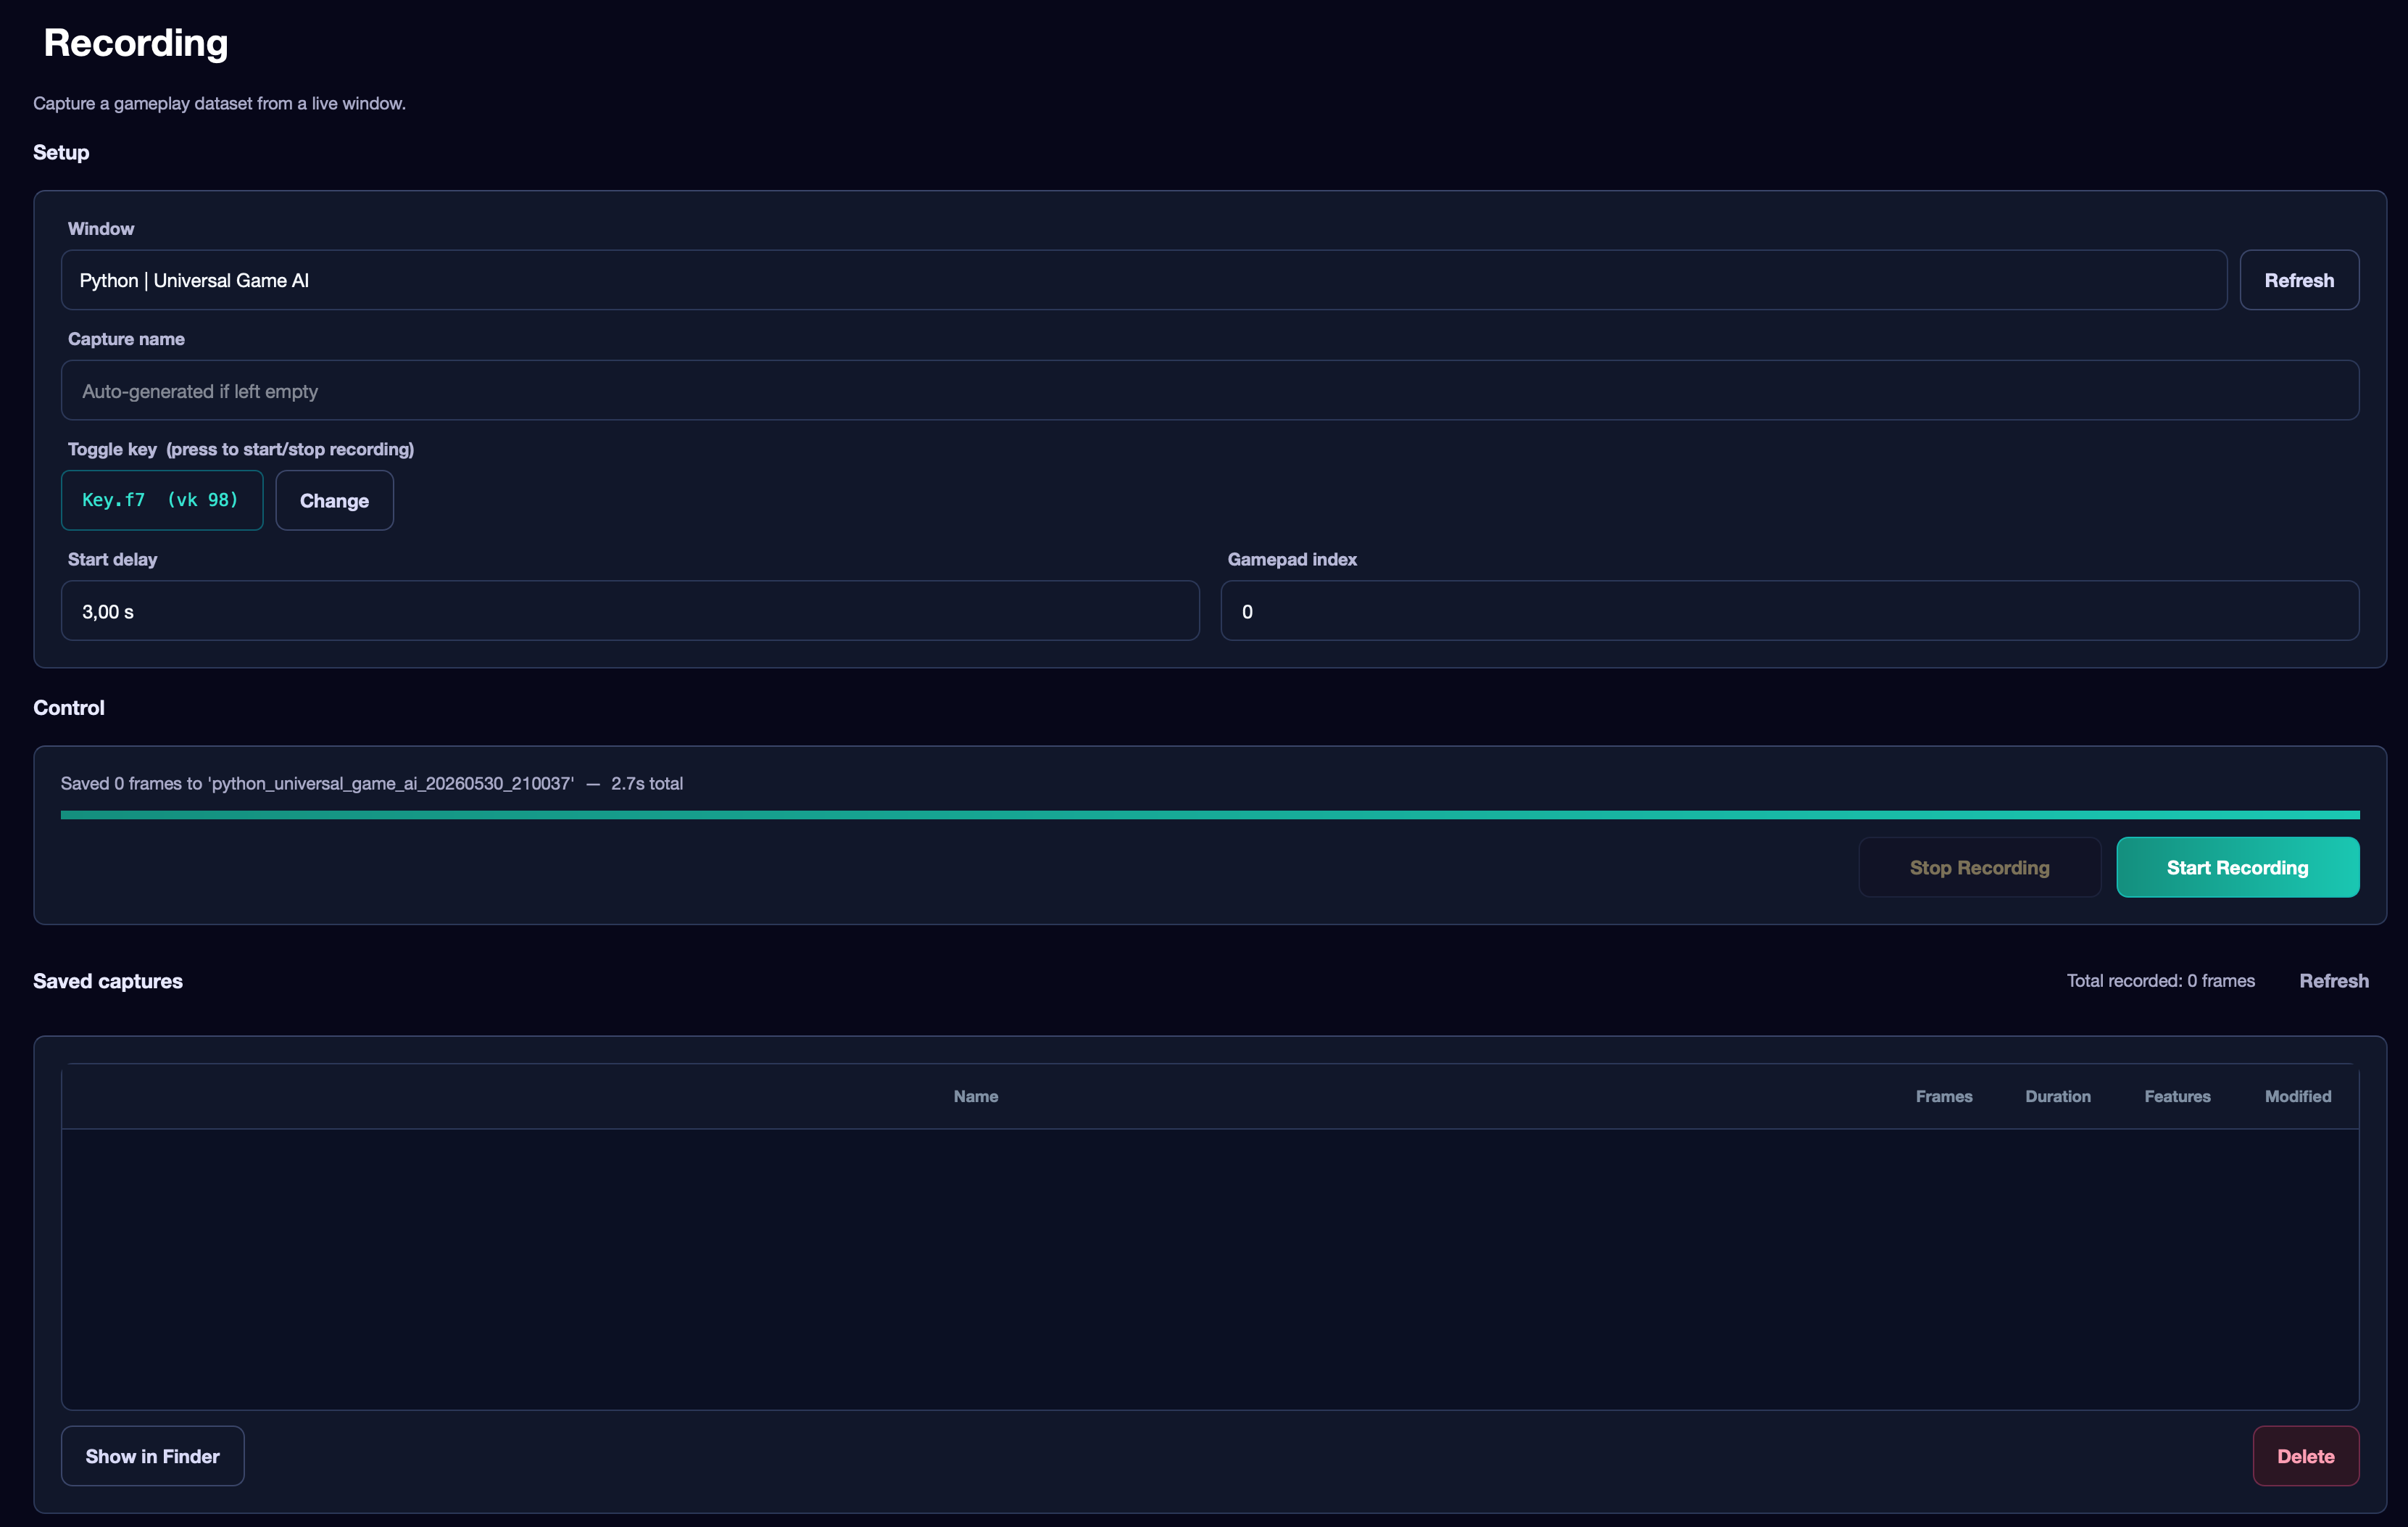
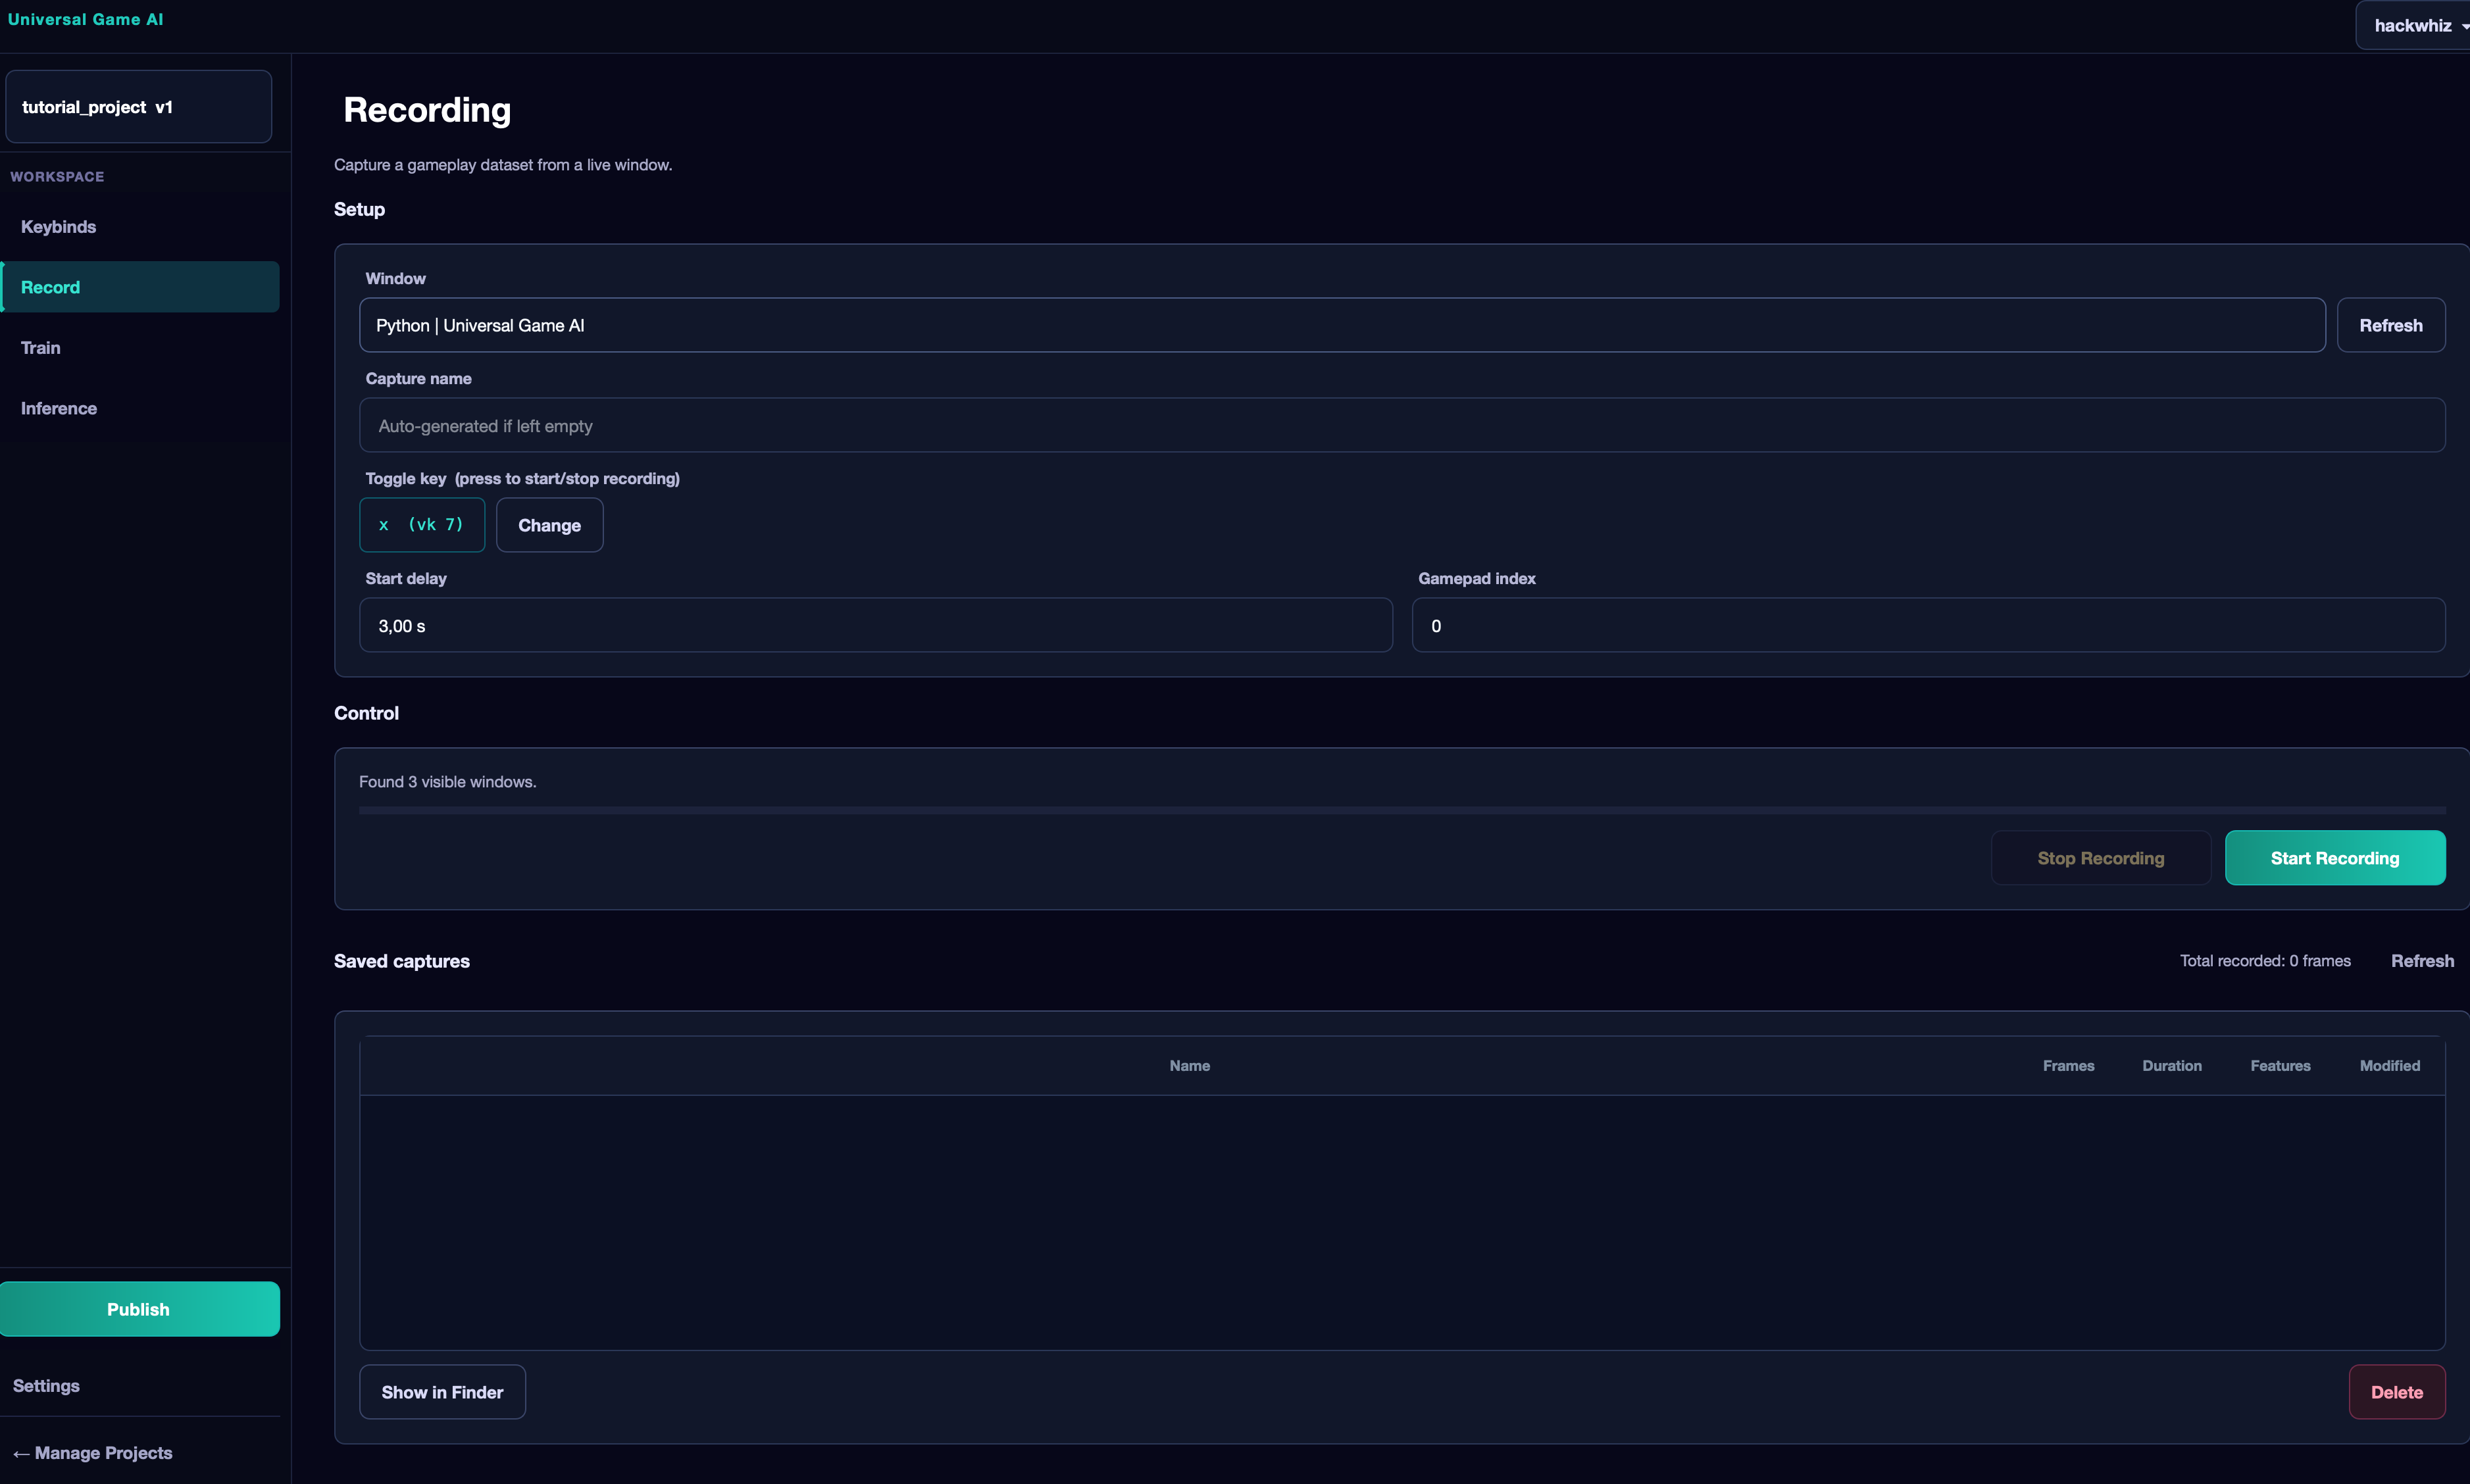
Recording Settings#
- Window — the game window. Choose carefully: a mistake here means thousands of frames with incorrect data.
- Capture name — the name of the recording. If left empty, a name will be generated automatically.
- Toggle key — the key to start and stop recording. The default is X. Pressing it works while the Record tab is open. To change the key — click Change.
- Start delay — delay before recording begins (default 3 seconds). This time allows you to switch to the game window after pressing the toggle key.
- Gamepad index — the physical gamepad index (0 = first connected). Only relevant if keybinds contain gamepad actions.
Control Block#
Shows the recording status: number of recorded frames and elapsed time.
Saved Captures List#
Below is a list of all recordings for this project and the total number of frames. For each recording: duration, frame count, and whether features have been computed for it (Features: Yes/No).
The Show in Finder button opens the selected recording's folder in the file manager. The Delete button deletes the recording after confirmation.
What a Capture Is and How Many to Make#
One recording is one continuous gameplay sequence. If you want to record gameplay in one location and then move to another with no logical connection between them (for example via teleport or command) — stop the recording, move, and start a new one. The same applies to different mechanics: if you record combat situations and farming situations separately — these should be separate recordings.
During recording, try to show varied situations and spend as little time as possible standing without any actions.
The Train Tab — Training#
Once the dataset is recorded, go to Train. There are four sub-tabs: Data, Config, Run, and Logs.
Data#
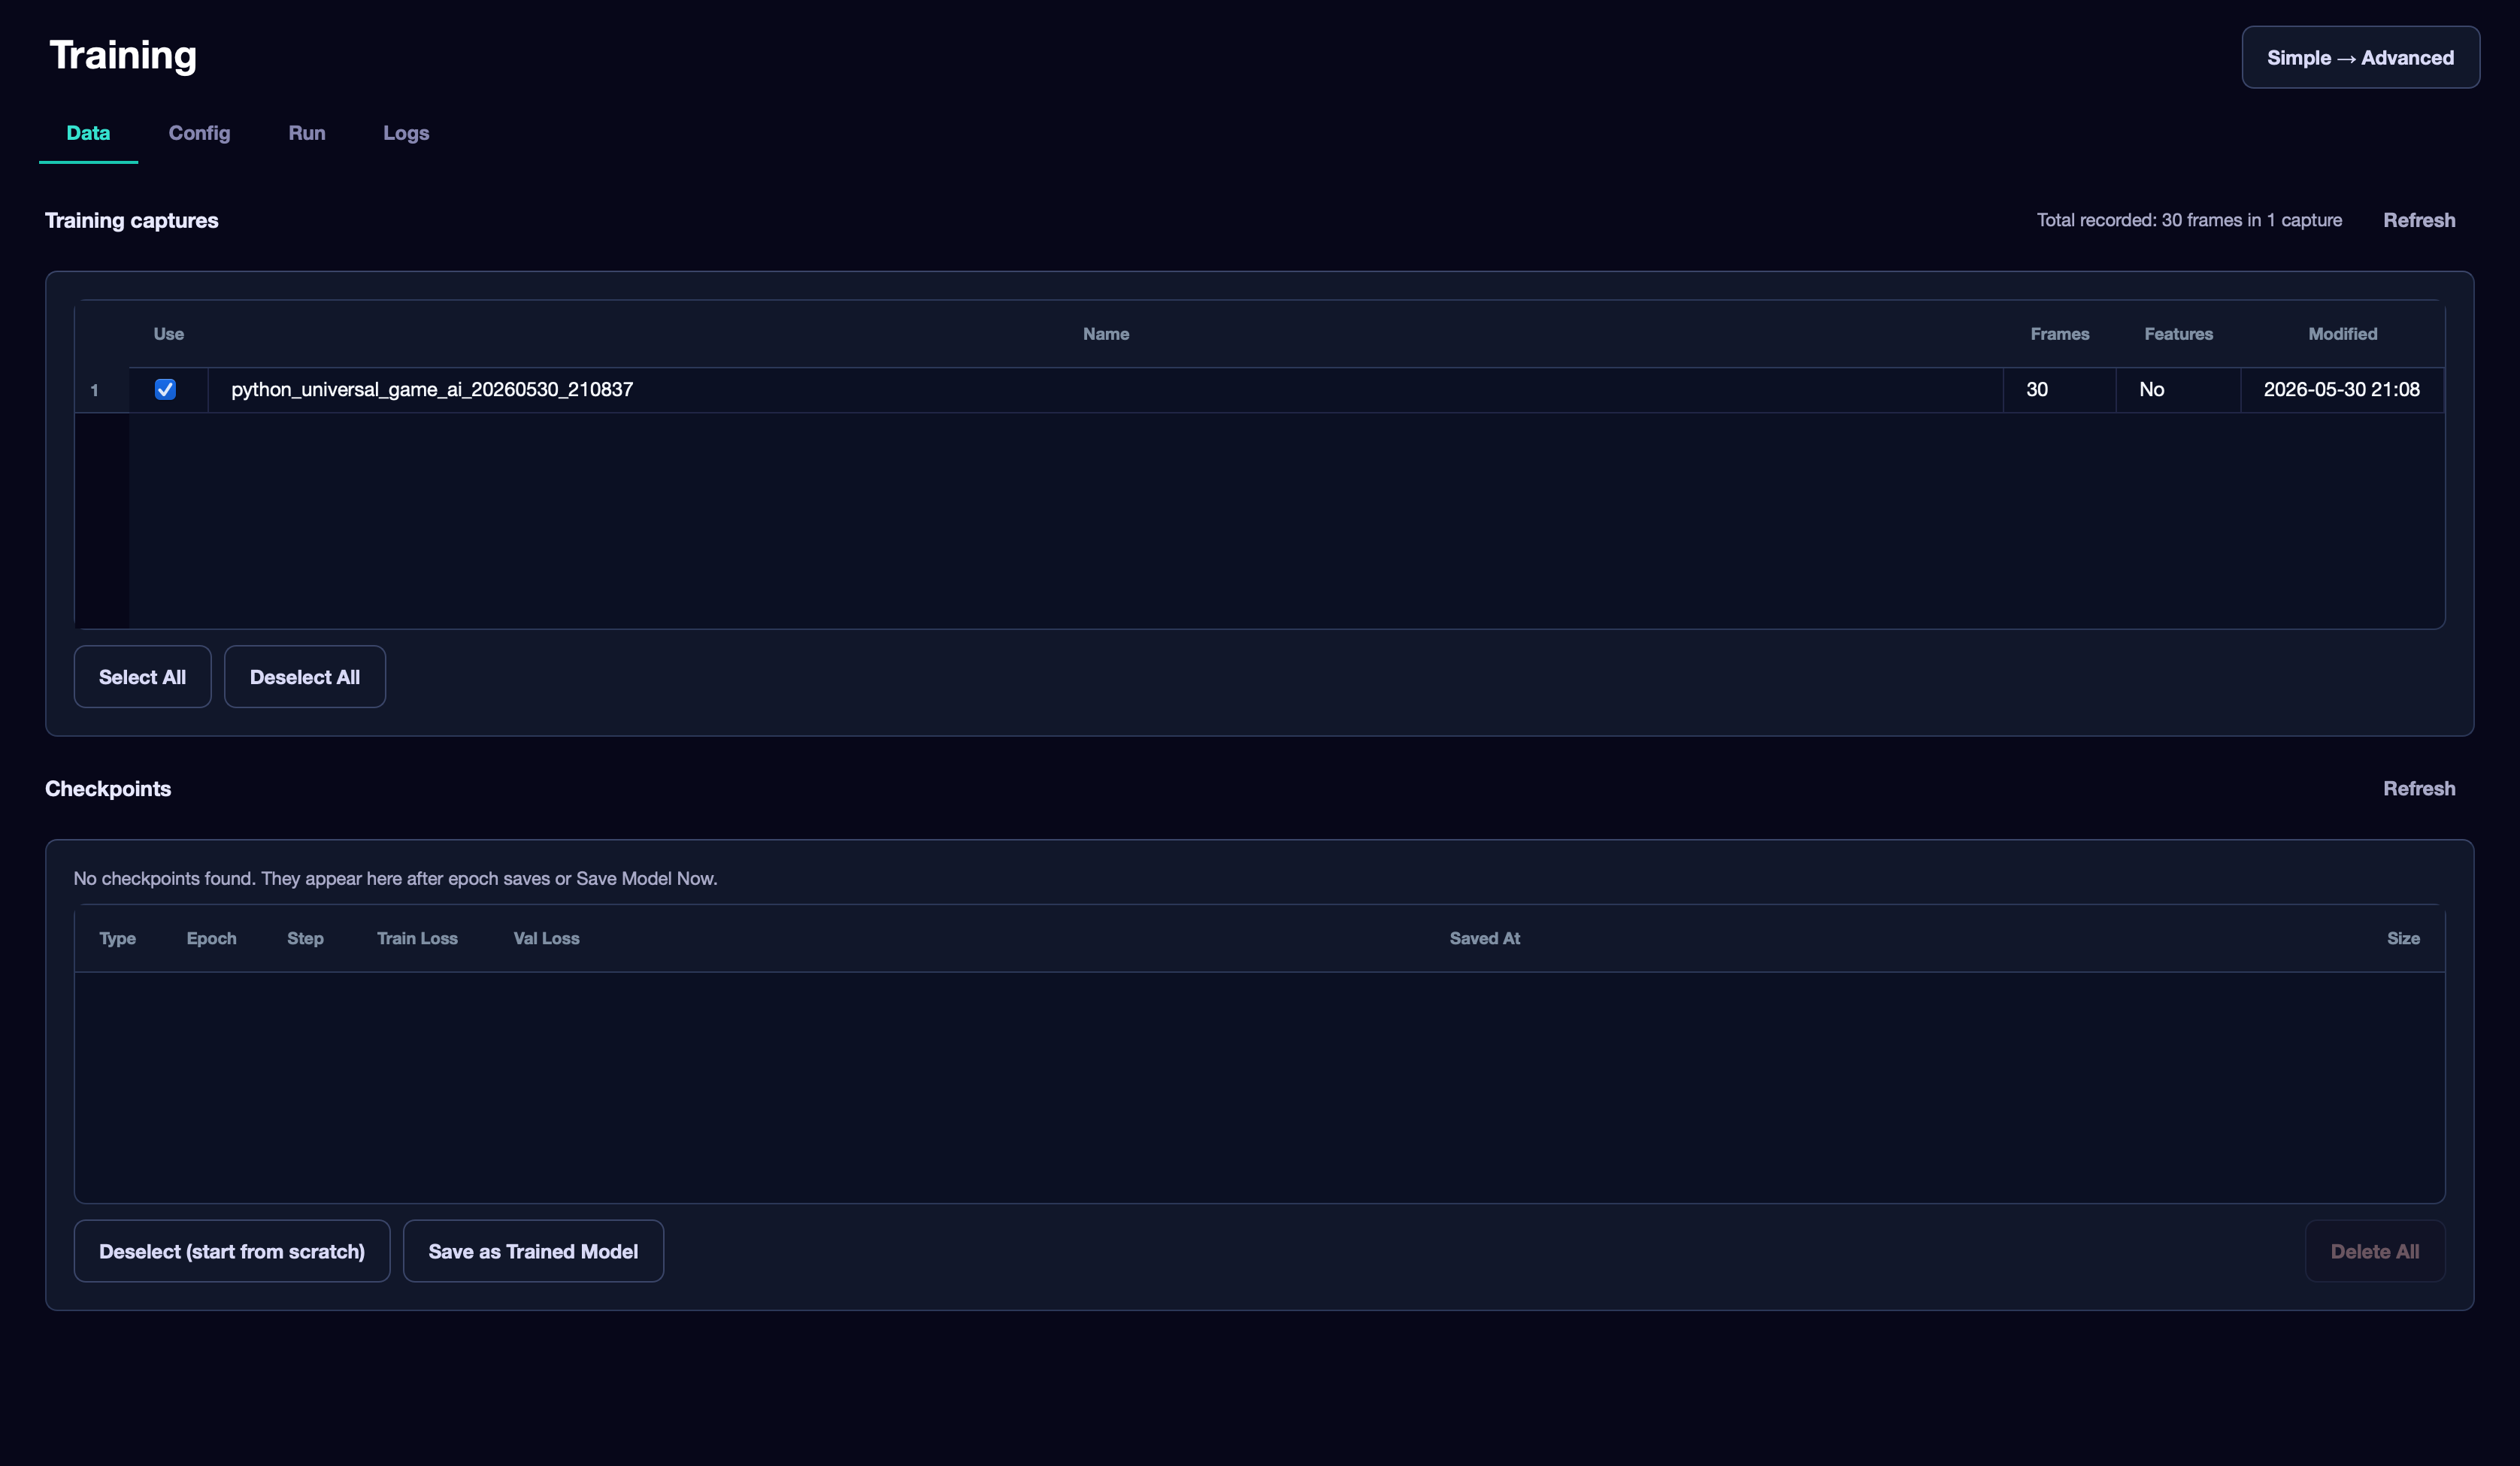
At the top is a list of your recordings. Check the ones you want to train the model on. Select All and Deselect All buttons help quickly select or deselect all recordings.
Thanks to selective training, you can, for example, get two different agents from one project: one trained on combat recordings, another on farming gameplay.
Checkpoints#
At the bottom of the Data tab is a checkpoint table. Checkpoints are intermediate model saves that appear after each epoch or after clicking Save Model Now.
The table shows: checkpoint type, epoch, step, training and validation loss values, save time, and file size.
If you select a checkpoint, you can:
- Continue training from it — the next run will be a continuation, not a restart. This is handy if previous training was interrupted or you want to fine-tune the model.
- Save as Trained Model — save this checkpoint as a finished model right now, without waiting for training to complete.
- Deselect (start from scratch) — cancel the selection so the next training starts from scratch.
- Delete All — delete all checkpoints from the current run. Saved trained models are not affected.
Config#
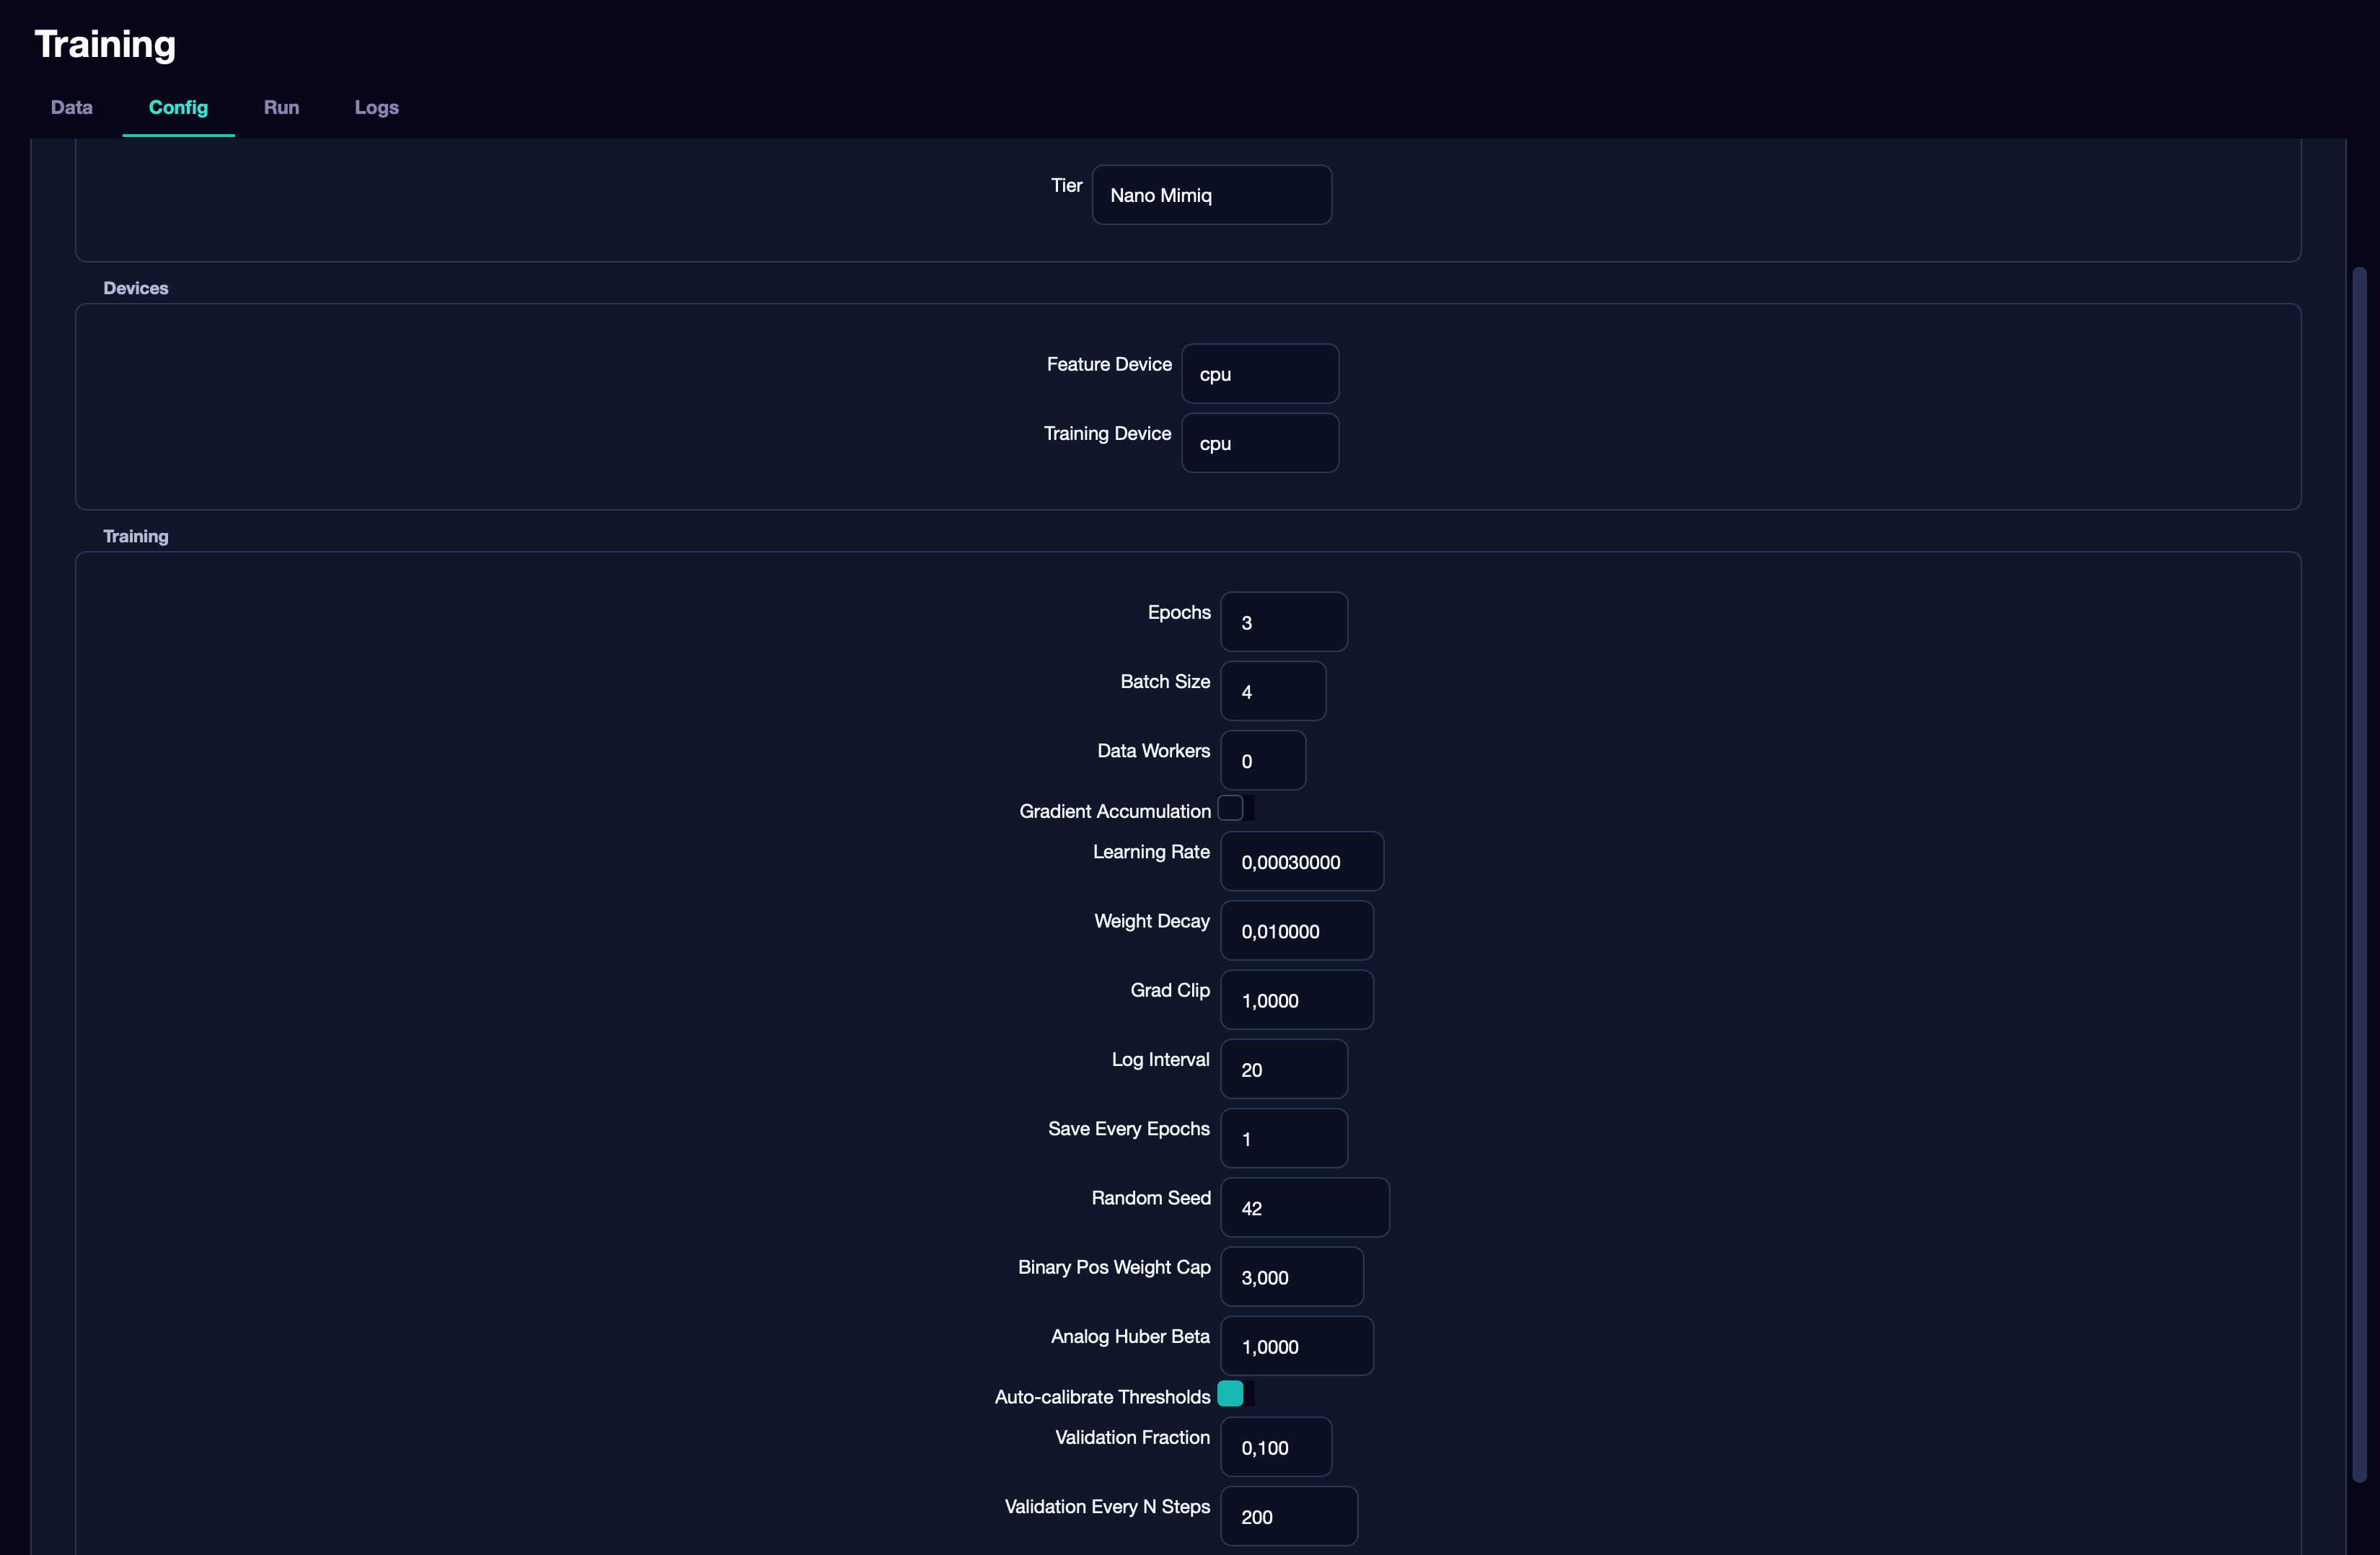
Here you configure the model and training parameters.
Model tier — model size. A smaller model trains faster, requires less data and fewer resources, but has limited capabilities. A larger one requires more data but is capable of more complex behavior. Approximate number of frames required for each model:
| Model | Approximate frame count |
|---|---|
| Nano | 1,000 – 10,000 |
| Micro | 10,000 – 50,000 |
| Tiny | 50,000 – 100,000 |
| Small | 100,000 – 500,000 |
| Medium | 500,000 – 10,000,000 |
| Mimiq (full) | 10,000,000+ |
These numbers are approximate guidelines from practice. The actual amount depends on the specific task. Just try different sizes and compare results.
Feature / Training Device — the training device. Same options: CPU, CUDA, MPS — the principle is the same as described above for inference.
Training block — main hyperparameters:
-
Data Workers — number of parallel data loading threads. Leave at
0for CPU. For CUDA or MPS — between2and4. More than four usually has no effect. -
Epochs — how many times the model passes through the entire dataset. Start with
3–5. If the model did not learn well — increase to20,50or more, monitoring the chart. -
Batch Size — how many frames are processed in one step. Depends on available memory:
- CPU:
4–8 - MPS (Apple Silicon):
16–32(for base M1/M2/M3),32–64(for Pro/Max/Ultra) - CUDA: 4–6 GB VRAM →
16–32, 8–12 GB →32–64, 16+ GB →64–128
The value must be a power of two (4, 8, 16, 32, 64…). The larger the model, the more memory it uses at the same batch size. If you get an out-of-memory error during training — halve the Batch Size.
-
Gradient Accumulation — only enable if Batch Size is limited by memory but you want the effect of a larger batch. For example: Batch Size
8+ Accumulation Steps4= effect of batch32. If memory is sufficient — leave this alone. -
Learning Rate — training speed. The standard value
0.0003works for most cases. If the model trains but results are poor — try0.0001. If the chart jumps chaotically —0.00005.
Auxiliary Objectives — auxiliary training goals. By default, their weights come from the selected model tier (in Nano, Micro, Tiny they are disabled; in Small and above — enabled with moderate values). If you want to change weights manually, enable Custom auxiliary loss weights and set the values in the Next-frame loss weight and Inverse dynamics loss weight fields. A value of 0 disables the corresponding task. More on these tasks in Part 2 of the documentation.
Run#
Click Start Training. Training proceeds in two stages:
Stage 1 — feature preparation. A special sub-model (DINOv3) processes each frame in the dataset and converts it into numerical feature vectors suitable for training. This step runs once — on subsequent training with the same frames it will not run again if features are already saved (marked as Features: Yes in the captures table).
Stage 2 — model training. After feature preparation, the main training begins. Two curves appear on the chart:
- Green — training loss (how much the model errs on the data it trains on).
- Purple — validation loss (how much it errs on data it has not seen during training).
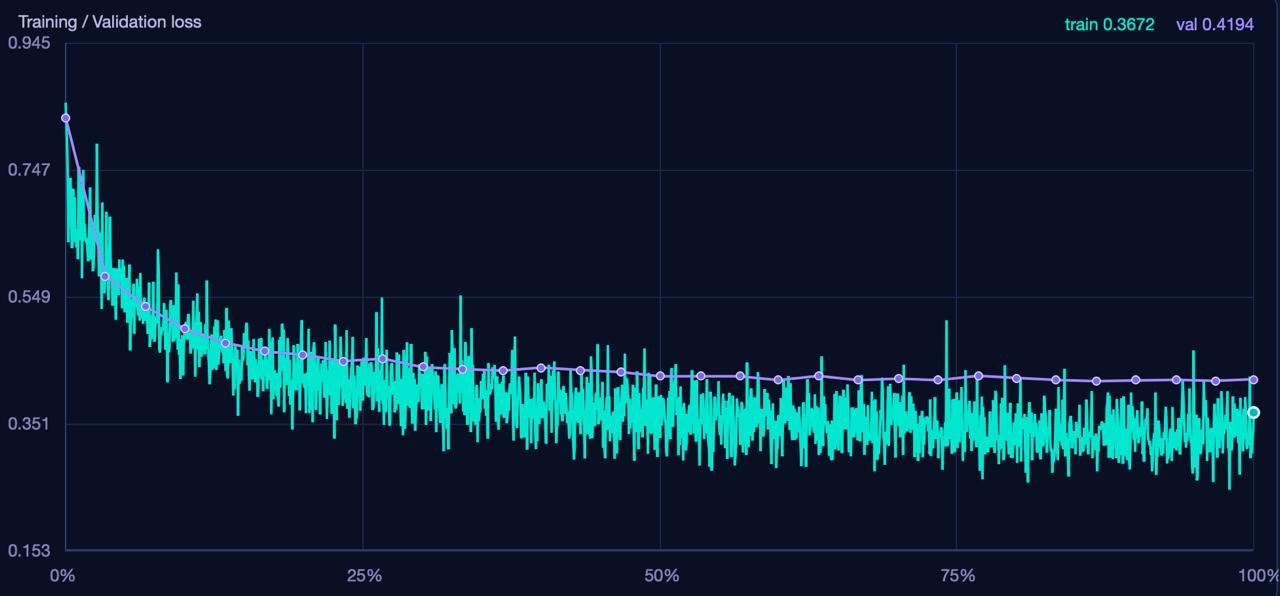
Both curves should gradually decrease. If both the training and validation curves go down — training is progressing normally.
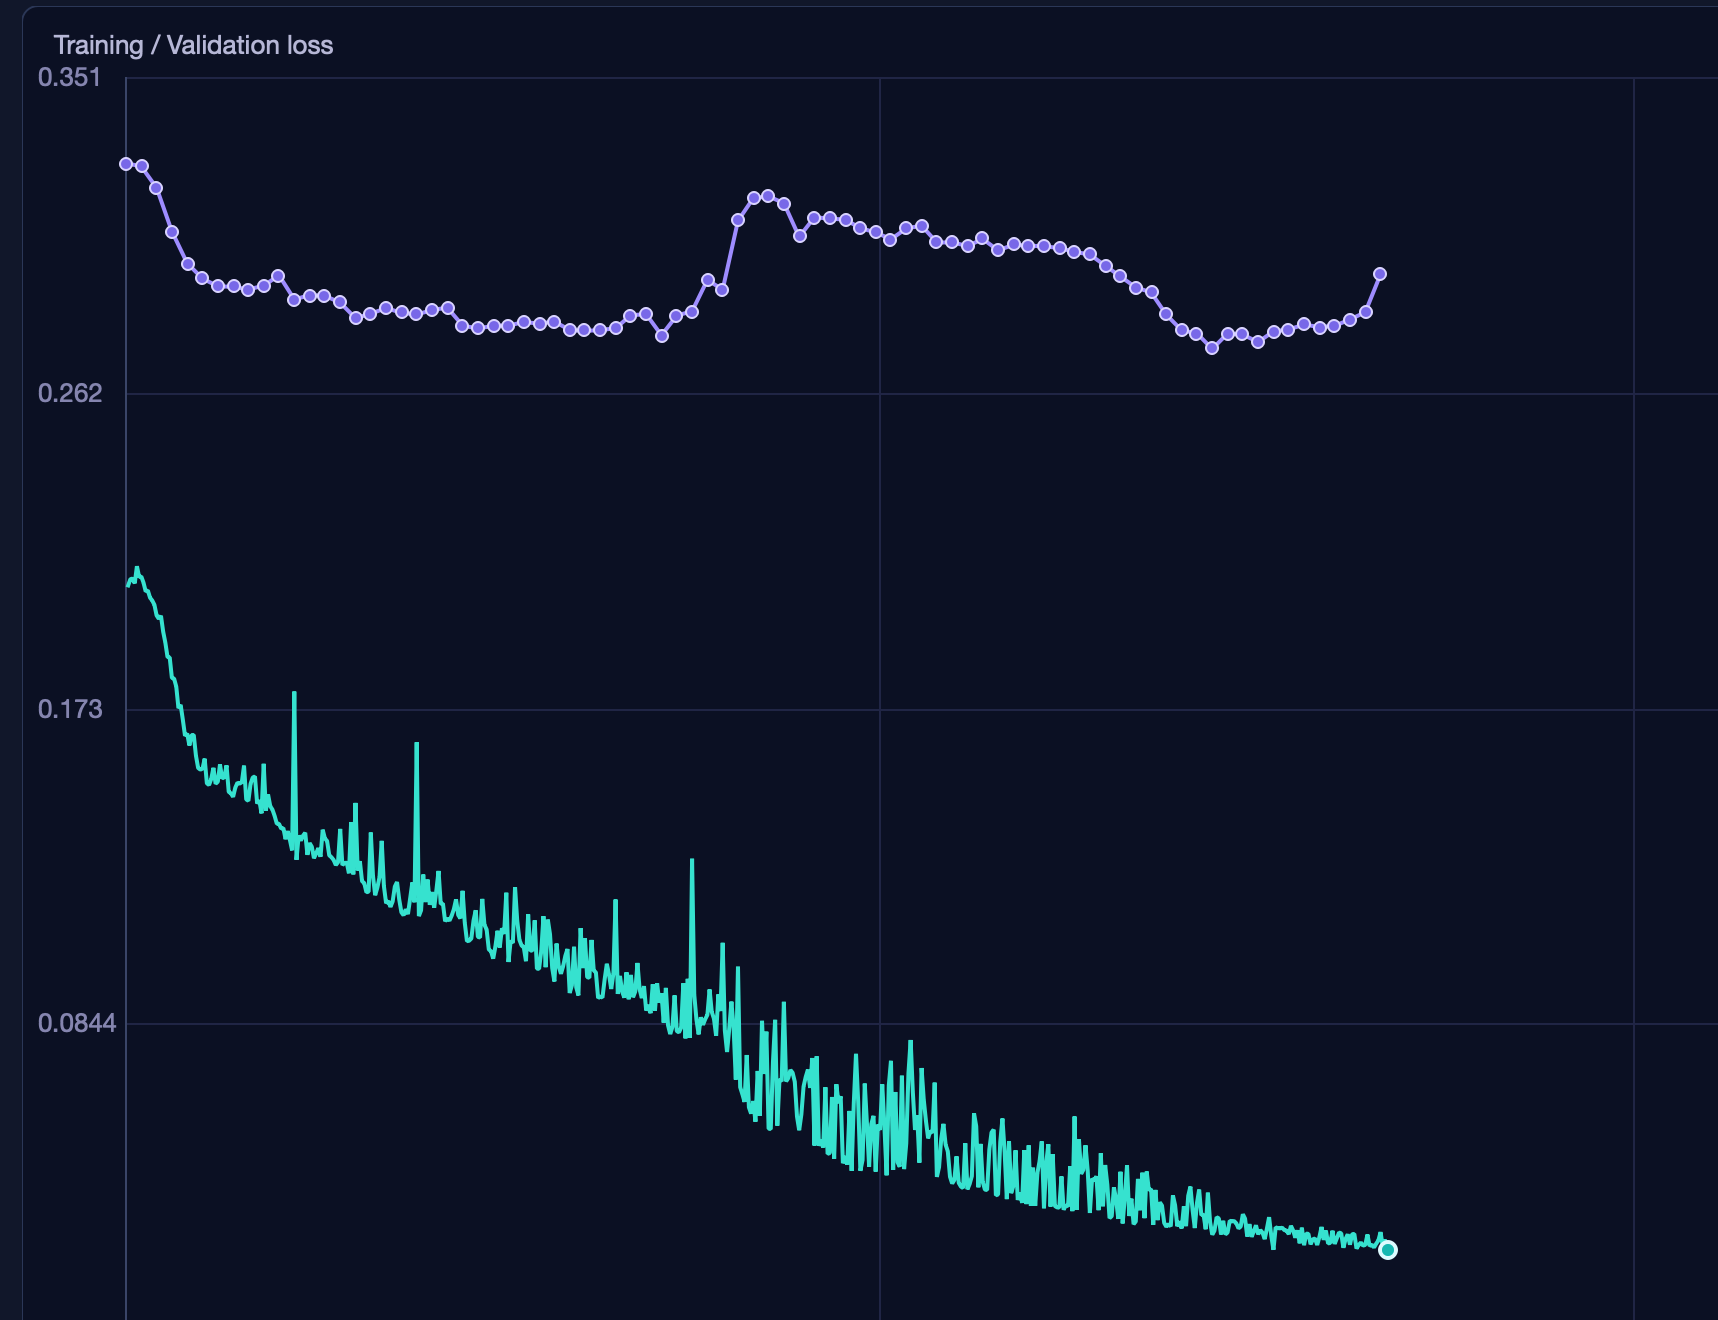
If the training curve goes down but the validation curve stays high or rises — the model is not learning. The most common cause: too little data or insufficient diversity. Try collecting more recordings or choosing a smaller model size.
Below the chart, the current status and ETA — estimated time remaining — are shown.
The Save Model Now button saves the model and stops training — useful if the chart has plateaued and is no longer improving but you set more epochs.
Logs#
A detailed log of the training process. Here you can see all preparation and training steps in text form. Available buttons: Copy All (copy all logs to the clipboard) and Clear (clear the log). The Autoscroll button toggles auto-scrolling to the last line.
Running Your Own Model#
After training completes, the application will offer to save the model. Enter a name — it will help you navigate if you have multiple models.
Go to the Inference tab. The operating principle is the same as for imported projects, but for your own models the additional buttons Rename (rename model) and Delete (delete) are available.
Publishing a Project#
If you want to share your agent with others, click the Publish button in the sidebar. It appears when you are inside a project that has at least one saved model.
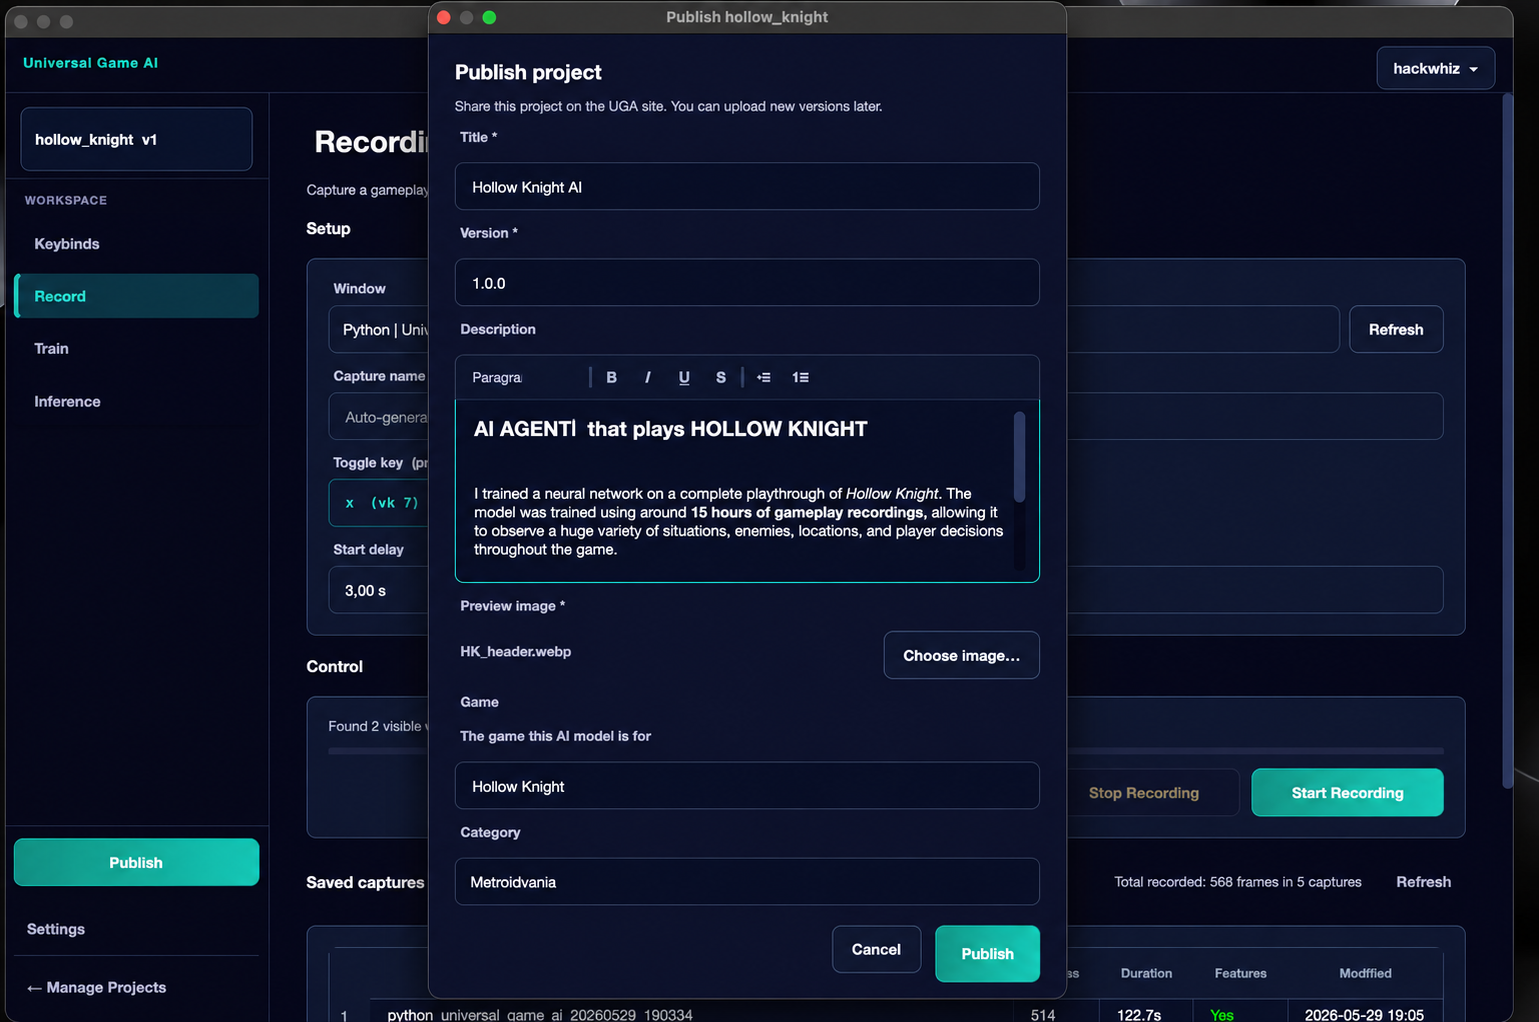
In the publish dialog, fill in:
- Title — the project name on the website.
- Version — a version label (for example,
1.0orbeta). - Description — project description. Indicate which game the agent was trained for, what it can do and in which situations, recommended model settings, and any other information that will help other users.
- Preview image — a screenshot or cover image (PNG, JPG, WEBP).
- Game and Category — metadata for searching the catalog.
After publishing, the button in the sidebar changes to Update. Clicking it lets you upload a new version — for example, if you have trained an improved model.
Project analytics, user comments, and general information can be viewed on the website on the My Projects page.
Part 2 — Architecture and Details#
The Mimiq Model#
Problem Setup#
Mimiq is an agent that implements behavioral cloning (imitation learning): given a sequence of visual frames from a game, the model reproduces the operator's actions recorded during demonstration recording. In simple terms — it learns to repeat what you did. Training amounts to matching the network's predictions to the target action labels in the same contexts where a human made decisions. This approach does not require an explicit model of the game environment and allows transferring learned behavior to new game scenarios within the distribution of collected data.
The Mimiq architecture is hybrid: a frozen visual encoder converts frames into semantic features, and a trainable transformer policy network integrates temporal context and forms an action distribution.
The Role of the DINOv3 Visual Encoder#
A raw pixel frame is not fed directly to the policy network. Each frame is first processed by DINOv3 — a compact variant of Vision Transformer pretrained on a large image corpus without binding to any specific game.
Why DINOv3 is part of Mimiq:
- Universal visual representation. The model extracts objects, textures, motion, and the spatial structure of the scene such that similar game situations receive similar internal representations — even if the graphics or interface differ.
- Training stability. The policy network trains on compact semantic features rather than raw images — this significantly reduces the amount of required data and computation.
- Separation of concerns. DINOv3 is not updated during training or inference (frozen encoder). Only the policy network is trained, interpreting the features in the context of the specific game and action set.
Technically, the encoder produces a grid of patch tokens (image fragments), from which a fixed-size spatial feature map is constructed (7×7 with 384 channels per cell). This map is saved for each dataset frame during the feature preparation stage and computed in real time during inference.
Policy Network Architecture#
The policy receives a window of recent frames — the context length depends on the selected model tier. For each frame in the window, the following sequence is executed:
1. Spatial Projection of Visual Features#
The DINOv3 feature map is processed by a convolutional sub-network that converts each cell of the spatial grid into a separate token. This preserves information about the position of events on the screen (left/right side, center, corners) — critical for games with any type of camera.
Additionally, the difference in features between neighboring frames (temporal delta) may be taken into account: it amplifies the motion signal without re-running the encoder.
2. Temporal and Auxiliary Features#
Non-visual vectors are added to each frame:
- Temporal: frame interval (in logarithmic scale) and a sequence break flag.
- Image motion features: aggregated metrics of brightness change and pixel differences across zones of the frame — a fast signal for local motion.
- Capabilities: for each keybind section that was disabled or enabled during recording, a binary flag is passed in the vector. During inference, these same flags are passed from the checkbox states in the interface, so the agent does not try to perform prohibited actions.
3. Transformer Context Integration#
Spatial tokens from all frames in the window are combined into a single sequence and processed by a transformer with rotary positional encoding (RoPE), a causal mask (future frames do not influence past ones), and modern attention and feed-forward blocks (RMS normalization, SwiGLU activation).
Attention can correlate events in different parts of the screen and at different moments in time — for example, an enemy appearing on the left two frames ago and the attack key press right now.
After the transformer, spatial tokens from a single frame are averaged into a single hidden representation, which is passed to the output heads.
4. Action Output Heads#
The output structure mirrors the keybind configuration of the project:
- Discrete actions (keyboard keys, mouse buttons, gamepad buttons): for each — the probability of pressing.
- Mouse movement: first, whether any movement is present is determined, then the normalized displacement vector.
- Analog sticks: similar logic in a different value space.
Auxiliary Learning Tasks#
In addition to directly reproducing actions, Mimiq can use auxiliary objectives that improve internal representation:
- Next visual state prediction — the model attempts to predict the features of the next frame from the current state. This forces the network to encode scene dynamics, not just the static frame.
- Inverse dynamics — given a pair of consecutive states, the model predicts the action that caused the transition. This aligns the temporal axis with cause-and-effect relationships.
By model tier presets, these tasks are not enabled everywhere: Nano, Micro, and Tiny train only on the main imitation; Small gets moderate weights; Medium and Large — higher weights. If you need to go beyond the presets — use Custom auxiliary loss weights in the Config tab.
Training Process#
Stage 1 — feature preparation. All dataset frames are passed through DINOv3 and saved in compressed form. In parallel, sample rarity weights, time intervals, and frame-to-frame motion features are computed. If features have already been computed — no re-run is needed.
Stage 2 — policy optimization. Training windows are formed from the prepared shards: for each position, the context of previous frames and the target action are taken (usually with a small temporal offset to compensate for human reaction delay). The dataset is split into training and validation parts.
The loss function combines errors across all keybind sections; for rare binary actions, weighted coefficients are applied; for mouse movement — a combination of binary presence classification and displacement vector regression. Optimization is performed with cosine learning rate decay and gradient norm clipping.
After training, threshold calibration may be performed for discrete keys: individual threshold values are selected from a sample of predictions, balancing precision and activation frequency. These are saved with the model and used during inference.
Real-Time Inference#
The loop repeats the training logic without weight updates:
- Capture a frame of the game window.
- Obtain DINOv3 features and supplement with temporal features, capabilities, and motion features.
- Maintain a context buffer with left-padding of empty positions at the start — the same way as during training.
- Run the policy and convert probabilities into specific key presses, mouse movements, or stick positions through the same action codec used during recording.
Limitations and Considerations#
Despite its great potential, the model has fundamental limitations related to the behavioral cloning approach.
Data requirements. For impressive results in complex games, a large amount of high-quality data is needed. Hundreds of hours of gameplay will be required to train an agent in games like Minecraft, strategy games, or RPGs with a large game world.
Deceptively simple games. Interestingly, training Mimiq in formally simple games like Flappy Bird or Chrome Dino is no easier than in complex ones. This is a consequence of the architecture: the model is designed to reproduce human behavior, not to find a minimally sufficient strategy. The advantage here is that all games are equally challenging — no need to specially tailor the method to the task.
Lack of planning. The agent does not reason about the future — it reproduces what it saw in the dataset. Games with a long decision horizon (puzzles, turn-based strategies, complex RPGs) are not Mimiq's strength. It is best suited for automating repetitive real-time actions: farming, combat, route traversal.
Situation coverage dependency. If the dataset contains almost no examples of bad situations and recovery from them, the agent will not know what to do when it makes a mistake. A good dataset contains both successful and unsuccessful situations.
Our Experiments#
Hollow Knight — Exploration#
We recorded approximately 15 hours (450,000 frames) of regular Hollow Knight playthrough without a specific objective: the agent observed the player interacting with the interface, navigating the map, fighting enemies, and talking to NPCs.
Hollow knight exploring
The result was mixed: the agent did not learn any one thing well, but clearly demonstrated contextual understanding — it behaved relatively appropriately in dialogues, performed basic platforming, and reacted to enemies encountered along the way. These observations show that without a clear focus in training data, the agent does not form reliable specialization — it understands the situation to some extent, but does not perform any task consistently.
Hollow Knight — Final Boss#
We then focused on one specific and difficult task — the final boss fight. ⚠️ Warning: spoilers ahead.
100,000 frames were recorded and a Small-size model was trained. The agent was unable to win, but demonstrated clear situational understanding: it attacked the boss, used magic, and dodged at the right moments. However, it performed well only for the first few seconds of the fight — after that it became confused.
Hollow knight boss
We believe the cause is the one-sided nature of the dataset: it had almost no examples of failed situations and how the player recovered from them. When encountering an unusual situation, the agent simply had no examples to follow.
Data Collection Recommendations#
Based on all experiments conducted, we can offer several practical recommendations.
Focus on a specific task. The narrower and more specific the task, the more effectively the agent learns with the same amount of data. If you want a combat agent — record primarily combat.
Record diverse situations. The dataset should not consist exclusively of flawless gameplay. Include mistakes, failed attempts, unusual situations, and ways to recover from them. The agent needs to know what to do in difficult moments, not just easy ones.
More data is always better. The frame count guidelines in the table above are minimums. The more high-quality and diverse data, the more stable the behavior.
Try to minimize idling. Frames where the player stands without any actions carry no useful information and reduce the effective quality of the dataset.
Experiment with model sizes. You can mathematically predict which parameters will be better, but in practice it is worth training several variants and comparing results on the live agent. Different settings can differ unexpectedly.
Thank you for reading the documentation. This project is open precisely because we want to learn how Mimiq behaves on different tasks, and we welcome your results, publications, and feedback.